Plugin
Plugins extend what ZCode can do. A single plugin can bundle skills, commands, subagents, and MCP servers, so teams can package reusable tooling into one extension and enable it from a single workspace.
What A Plugin Contains
A single plugin can bundle several capabilities. ZCode detects which components a plugin includes from its directory layout and shows them as badges or counts in the list:
| Component | Description |
|---|---|
| Skill | Skill files that teach the Agent specific ways of working |
| Command | Quick commands invoked with / |
| Agent | Subagents registered together with the plugin |
| MCP servers | External tool servers registered with the plugin, shown under the Plugin MCP servers group in the MCP list |
| Hook | Automation hooks triggered on specific events |
When you enable a plugin, its runnable components — skills, commands, and MCP servers — are registered into the current workspace; disabling it disables them together.
Browse And Install Plugins
Open Settings -> Plugins and you land in the plugin store. A search box at the top finds plugins across every source, and below it the store splits into two segments, Public and Personal:
- Public: the catalog ZCode curates. Featured plugins come first, and the rest are grouped into categories such as Developer Tools, Productivity, Utilities, Guides, and Templates. Large groups can be expanded to show everything.
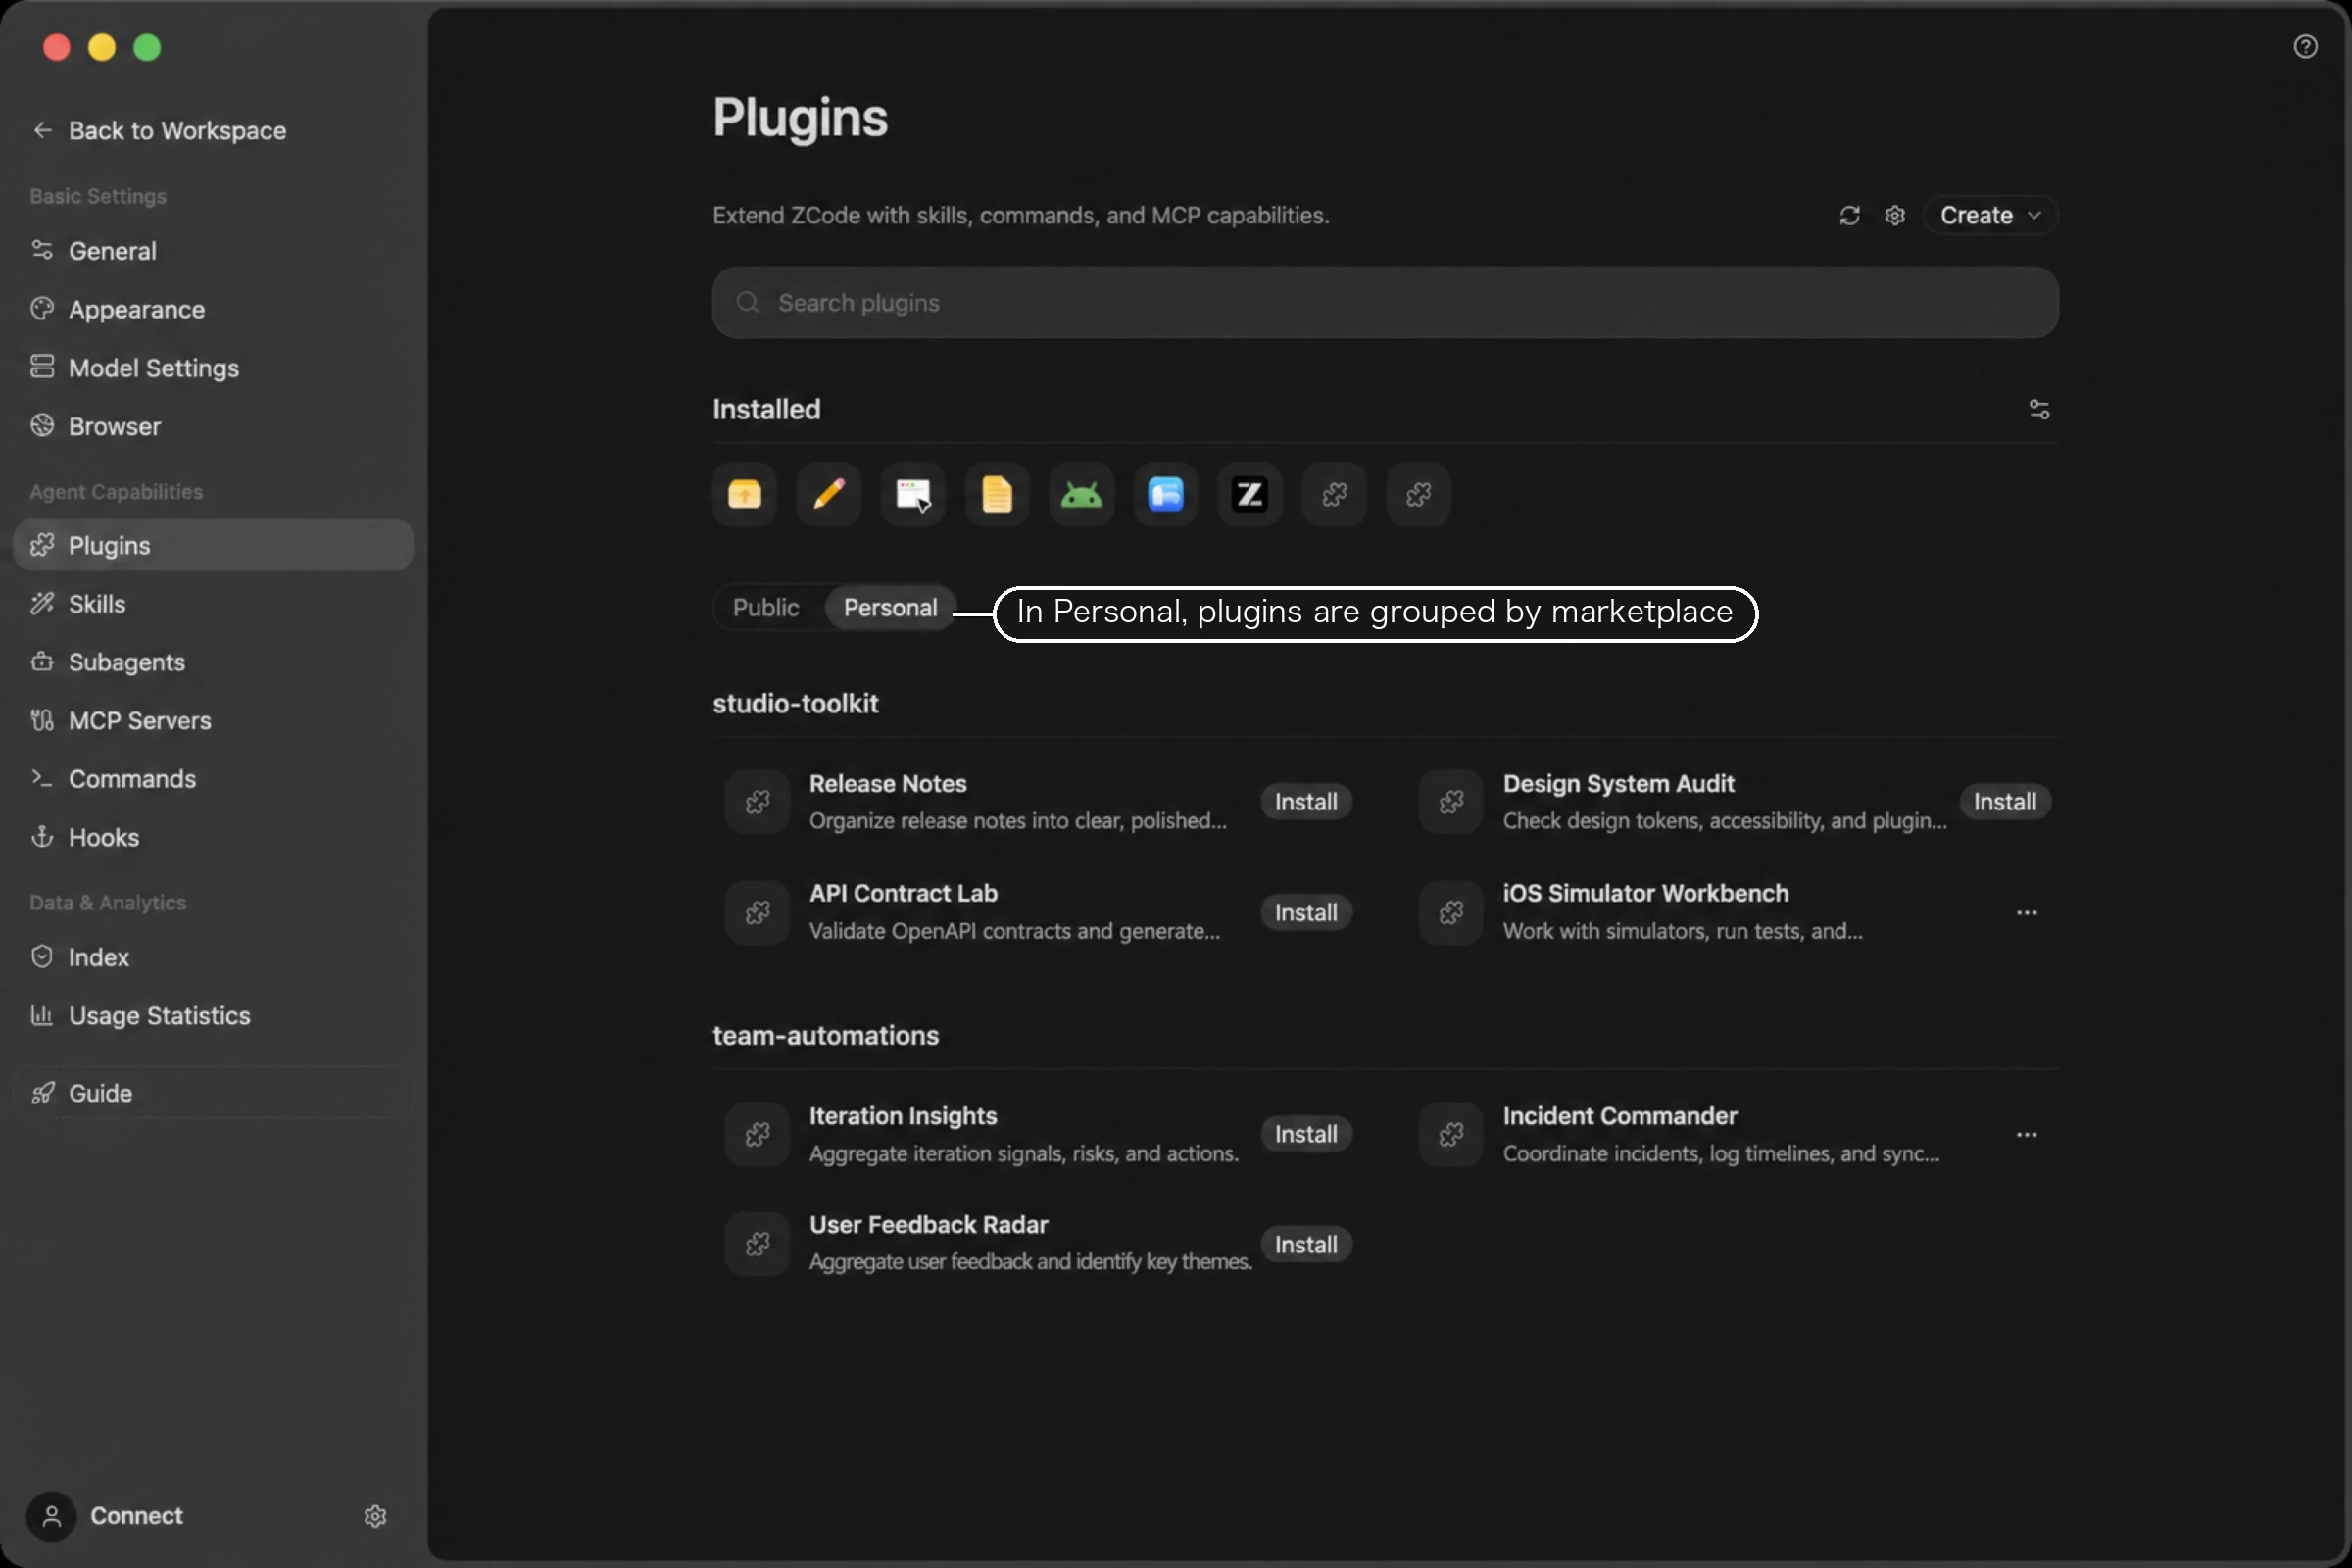
- Personal: the marketplaces you added yourself, starting with recommended entries and then grouped by marketplace name. ZCode preloads the Claude Code marketplace here, so you can browse and install from it without adding anything; to bring in other sources, use Create in the top-right corner.
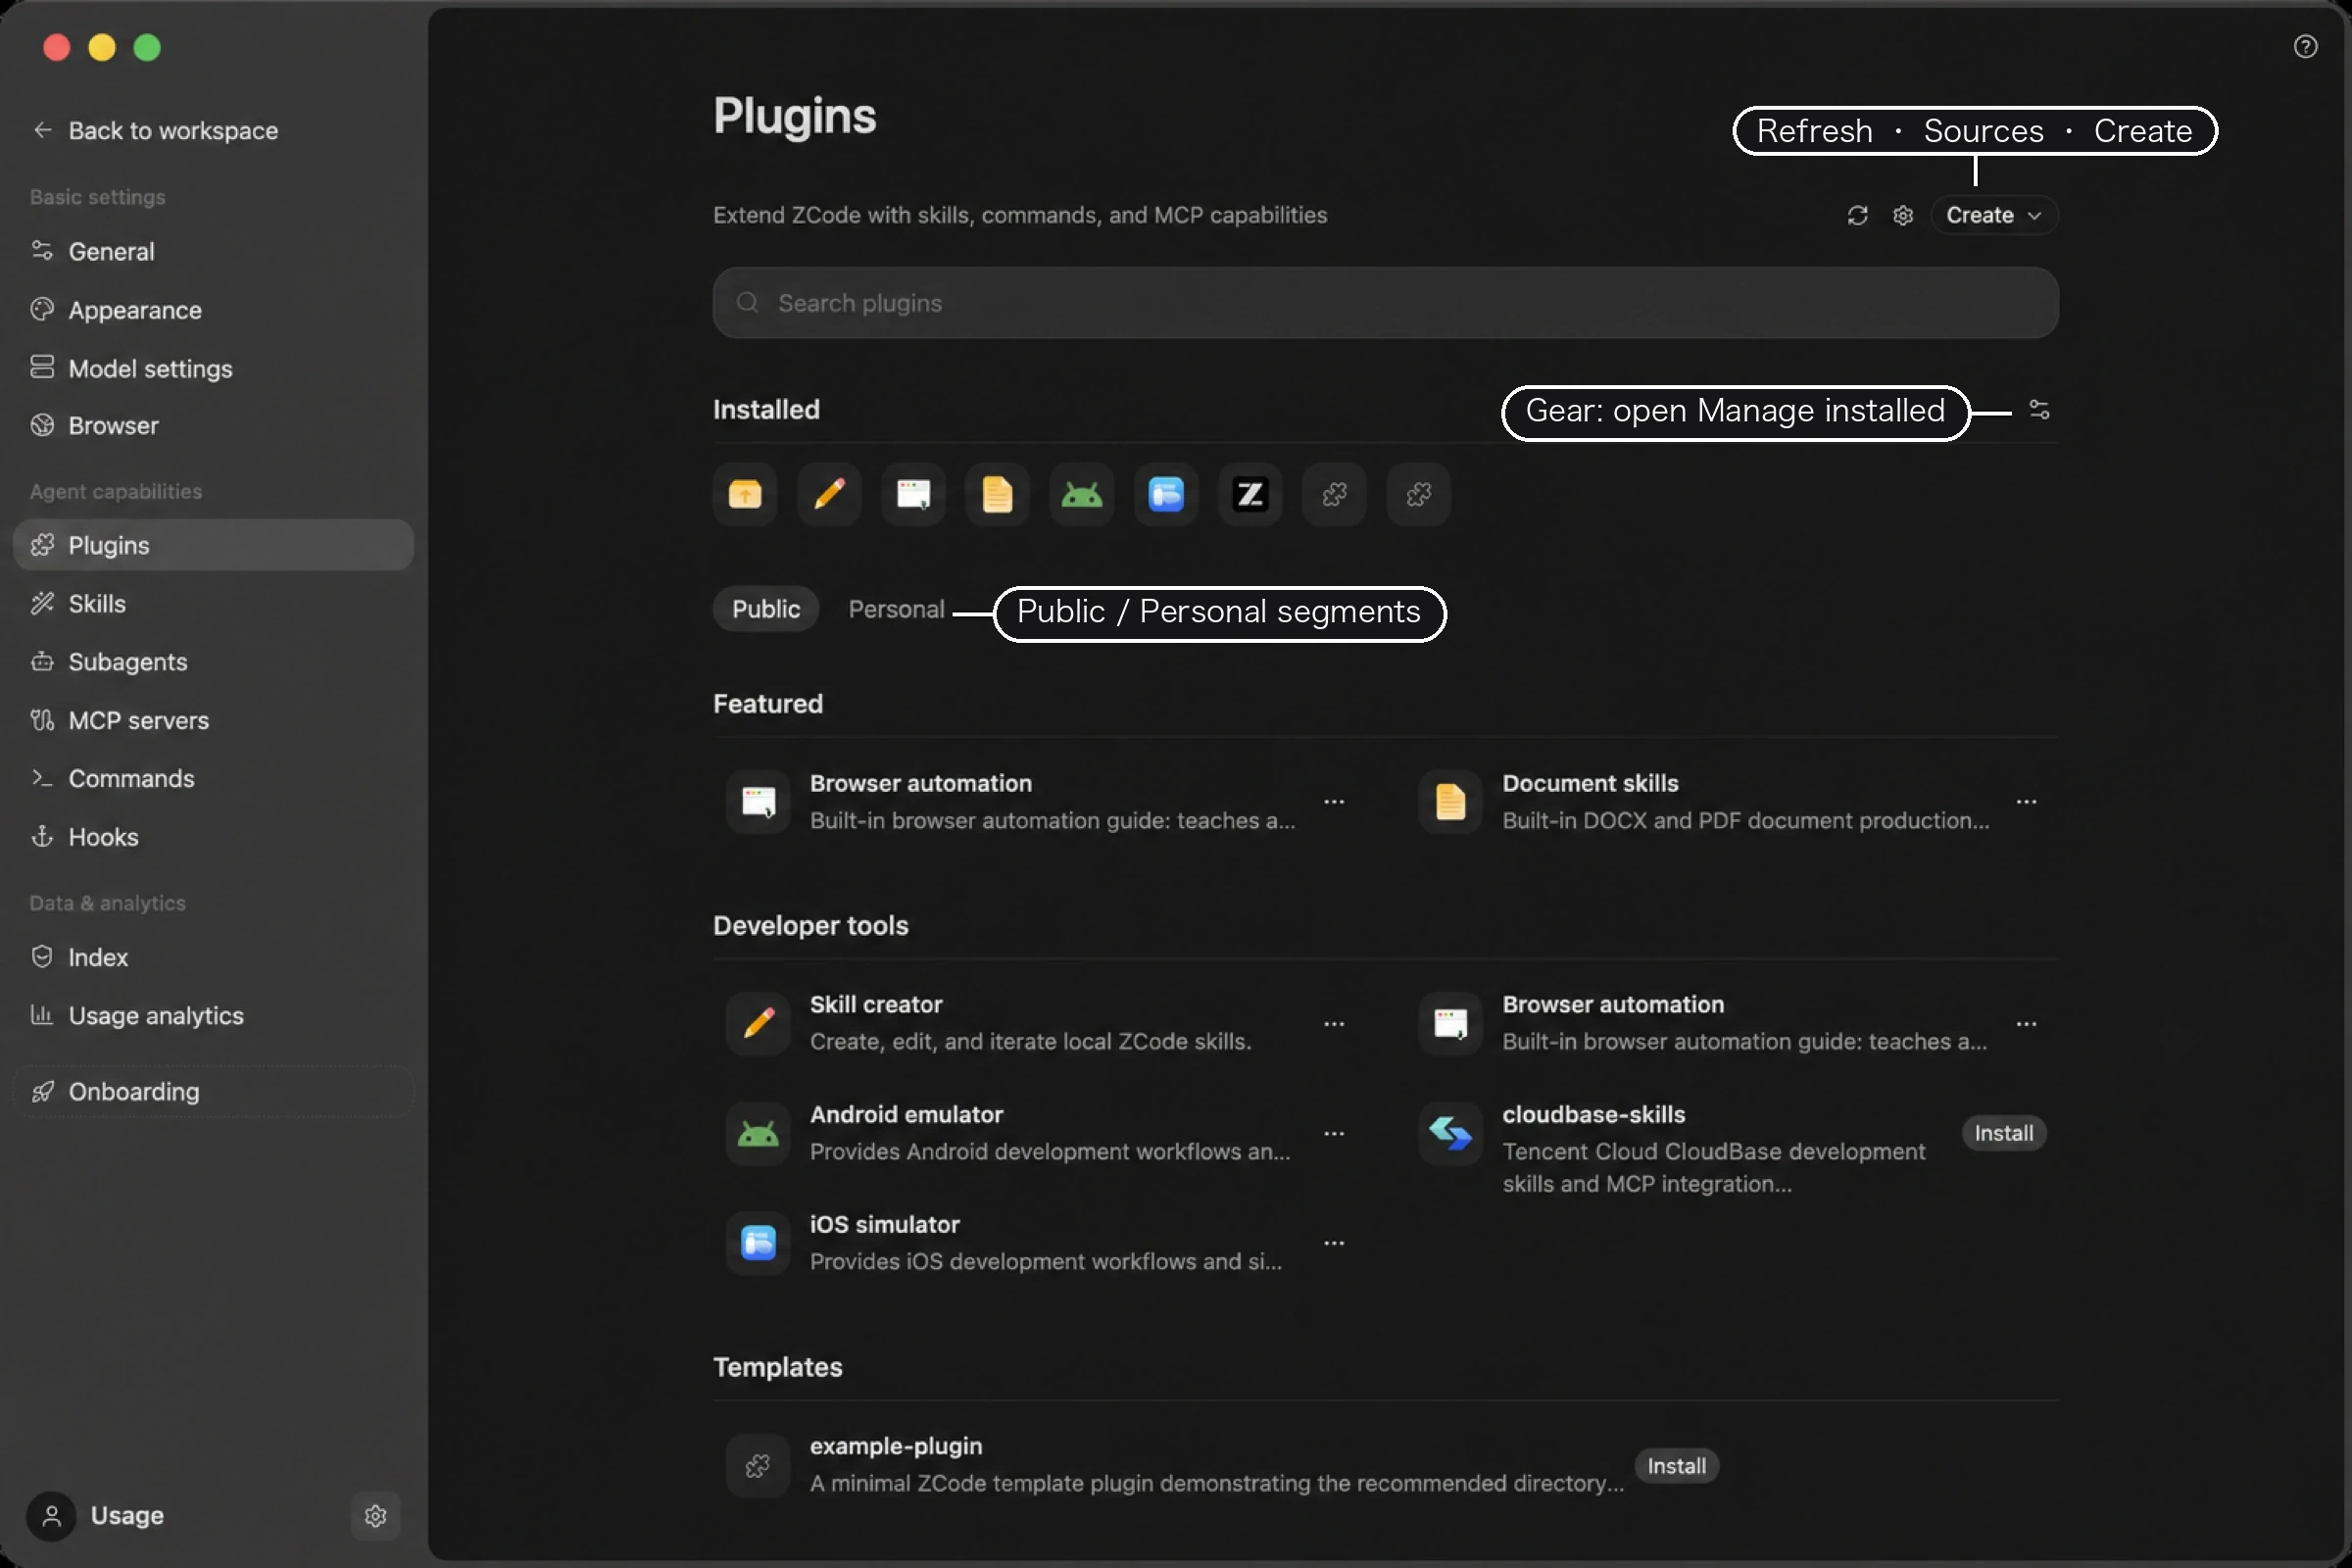
The plugin page requires an open workspace. If you see "Open a workspace to manage plugins," open any project / workspace first. The public catalog is served from GitHub, so the catalog, plugin details, and installs may fail when GitHub is unreachable. When the list looks stale, click Refresh in the top-right corner.
Once you find a plugin, click Install on its card — the status moves through "Installing…" to "Installed." Newly installed plugins are enabled by default, and their components are available immediately.
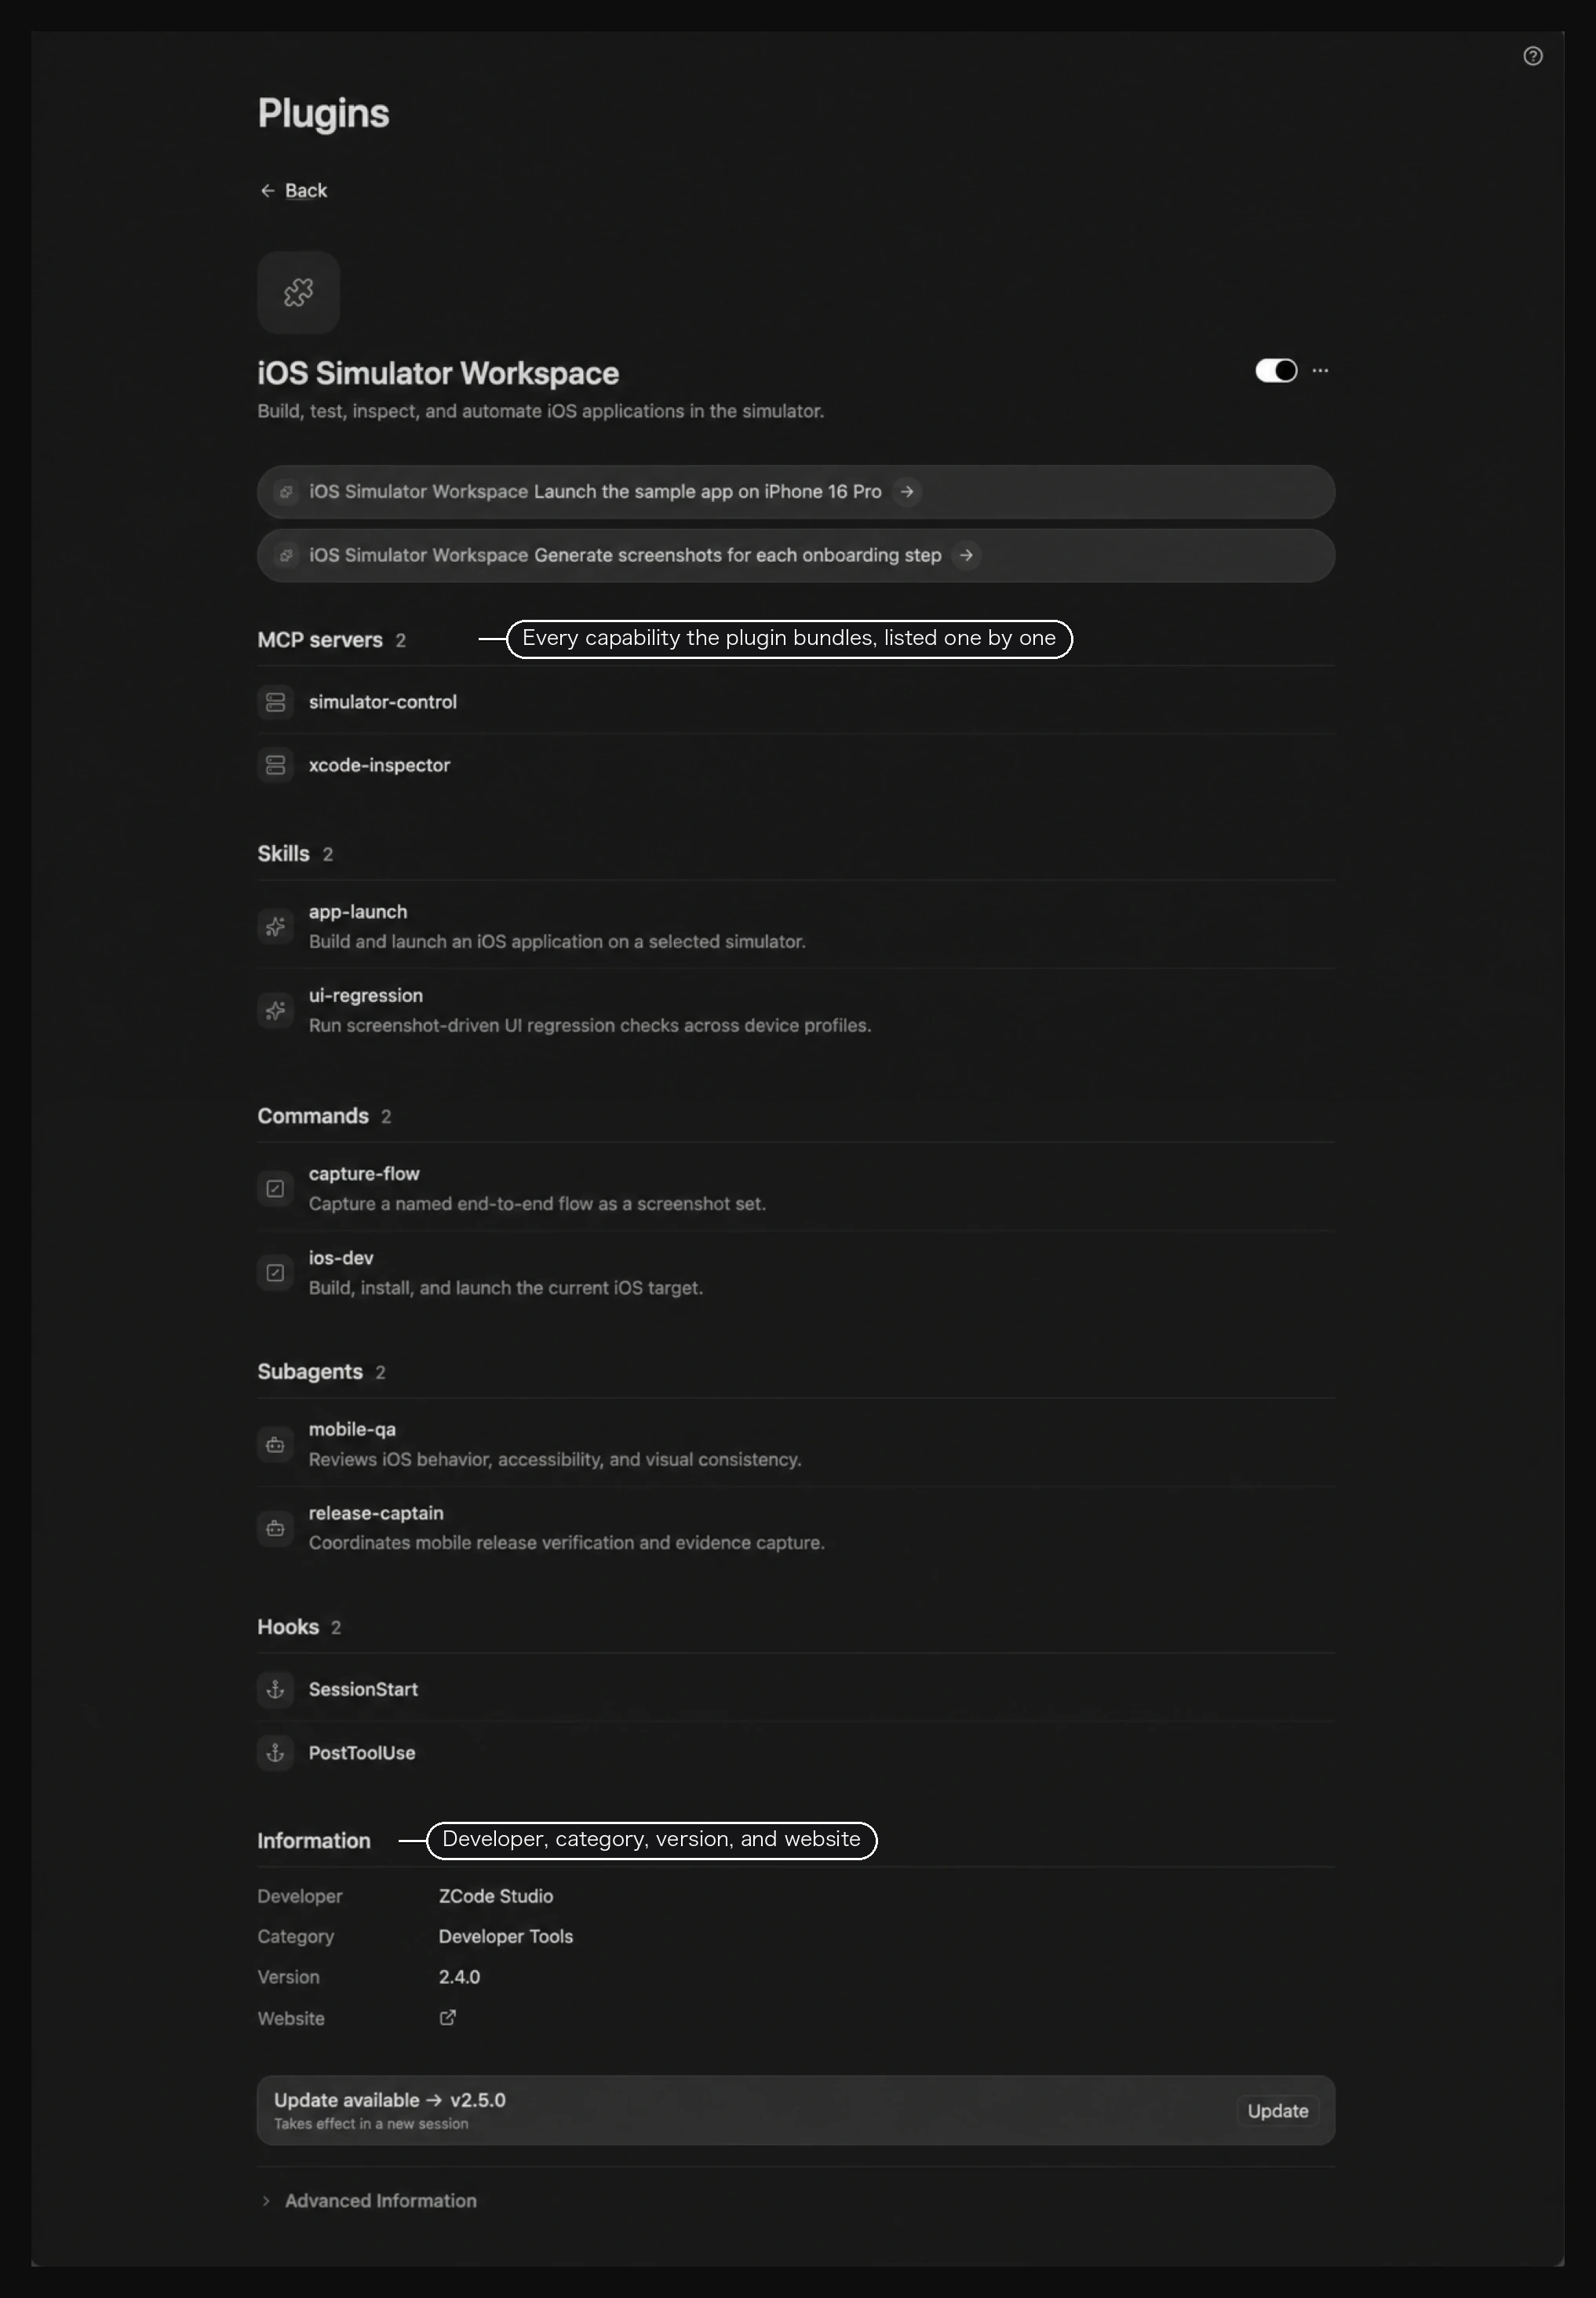
Click any plugin to open its detail view, where ZCode loads the exact skills, commands, subagents, MCP servers, and hooks it bundles, along with the developer, category, version, and website — so you can see what it adds before installing.
Add Your Own Marketplace
You are not limited to the public catalog. Click Create -> Add marketplace in the top-right corner and point it at a source:
- A GitHub repository (e.g.
owner/repoor its URL) - A Git URL
- A local marketplace file or directory — you can also drag a folder in or click Choose directory
ZCode validates the marketplace before adding it. Once added, the plugins it publishes appear under its name in the Personal segment, ready to browse and install like any other plugin.
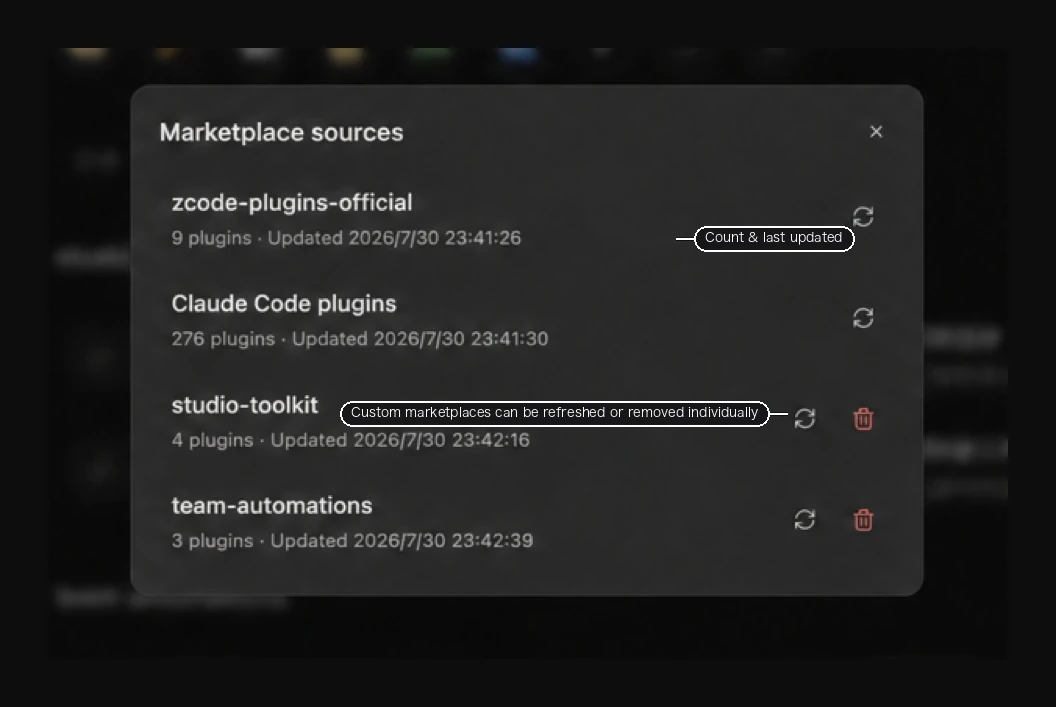
The gear icon above the search box opens the Marketplace sources panel, where you can see how many plugins each marketplace provides and when it was last updated, then Refresh this marketplace or Remove this marketplace individually.
Want to build your own plugin or set up a team marketplace? See Develop Your Own Plugin below for the plugin directory layout, the
plugin.json/marketplace.jsonfield reference, and complete JSON examples.
Built-in Plugins
ZCode ships with a set of official plugins. Two are enabled out of the box; the rest are bundled and ready to turn on when you need them.
| Plugin | Capability | Default |
|---|---|---|
| document-skills | Built-in skills for generating documents such as DOCX and PDF | Enabled |
| skill-creator | Create and edit your own local skills | Enabled |
| android-emulator | Android development workflow and emulator automation | Off by default |
| ios-simulator | iOS development workflow and simulator automation (macOS) | Off by default |
| restore-legacy-sessions | Migrate and restore sessions from older versions | Off by default |
The mobile-development plugins android-emulator and ios-simulator stand out: once enabled, ZCode Agent can drive the Android emulator or iOS simulator directly — building and running, installing and launching, and verifying the UI all within the same conversation. No more bouncing between an IDE, a simulator, and the command line, so mobile development stays smooth and fast.
Manage Plugins
Once you have plugins installed, an Installed strip of icons appears under the search box; clicking an icon opens that plugin's details. The gear icon at the right of that row opens Manage installed, where every plugin on this machine is listed with its name, version, source tag, and the counts of the components it bundles.
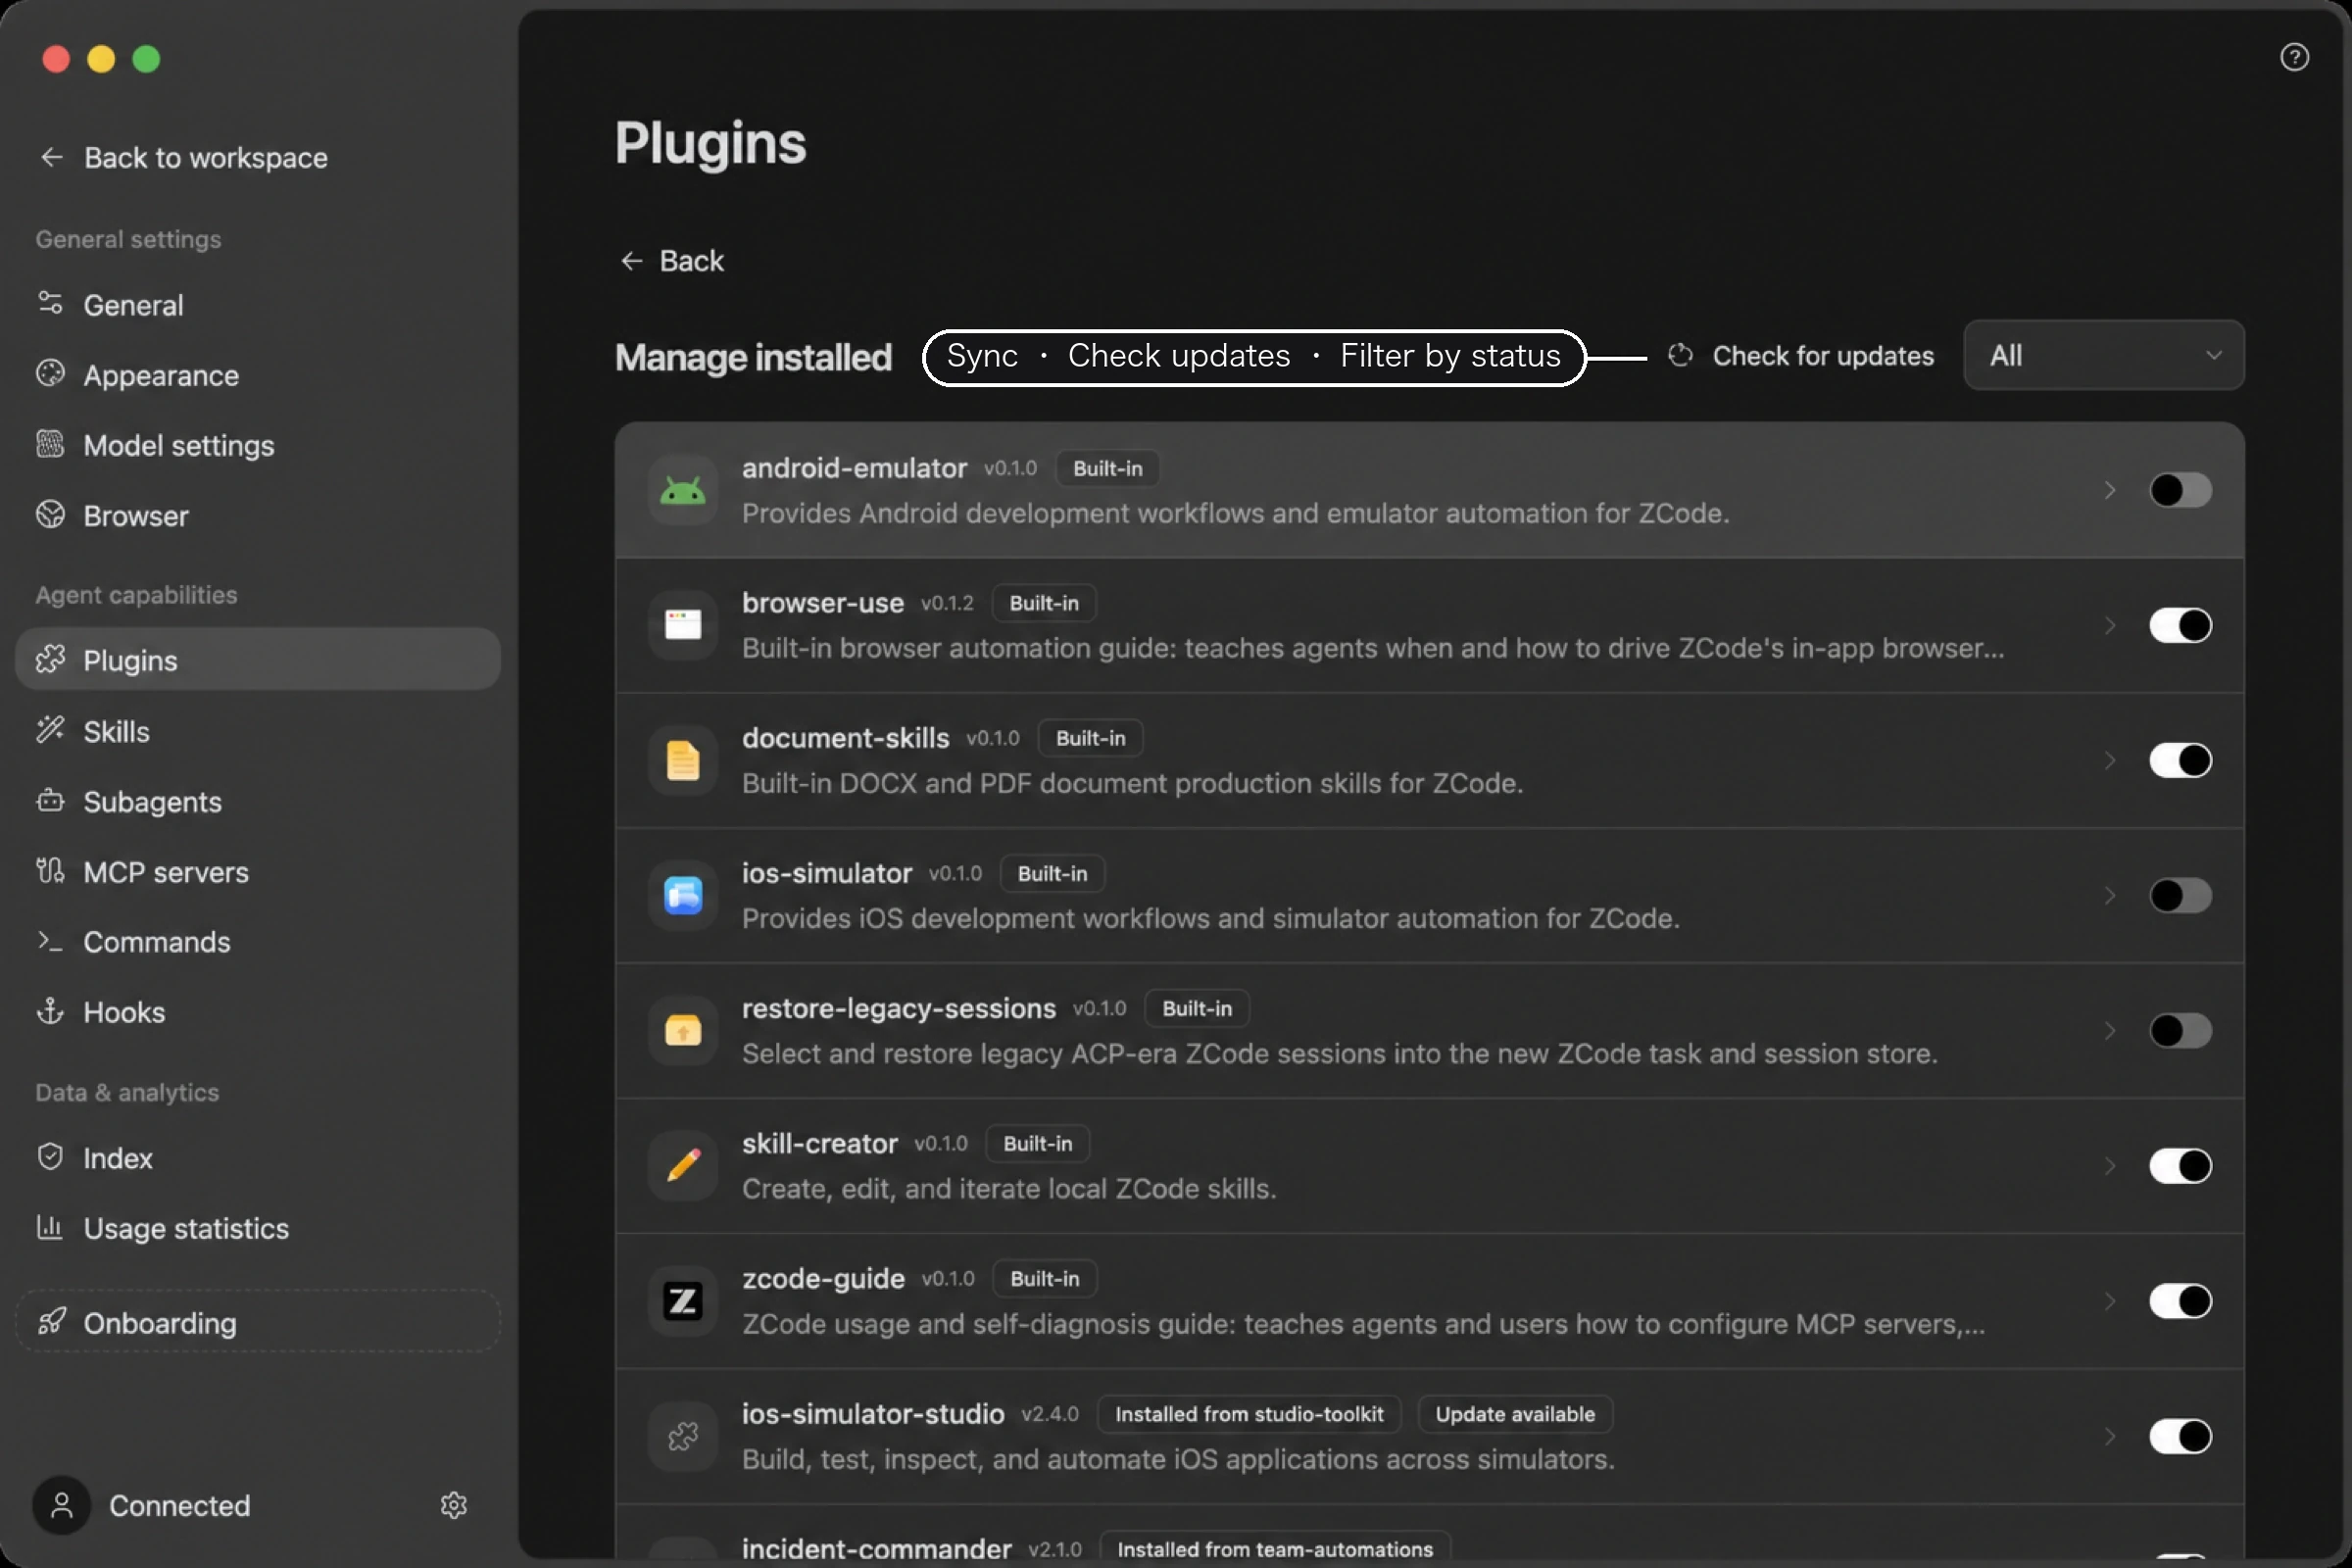
From this page you can:
- Filter by enabled or disabled status using the control in the top-right corner.
- Check the source tag of each plugin, such as
Built-inor the name of a marketplace. - Enable or disable a plugin with the switch on the right.
- Click Check for updates to fetch the latest versions; plugins with an update available are badged. Note how versions are compared: the "latest version" comes from the
versiondeclared in the marketplace'smarketplace.jsonentry, while the "installed version" comes from the plugin's ownplugin.json. If a marketplace entry ships without bumping itsversion, no update is offered even when the plugin code has changed — always bumpmarketplace.jsonwhen publishing to your own marketplace. The check runs against the locally cached marketplace manifest; if results look stale, Refresh this marketplace in the Marketplace sources panel first. - Click a plugin entry to see the exact skills, commands, MCP servers, and other components it contains, and to uninstall it. Built-in official plugins can be uninstalled too.
Because plugin changes require reloading the Agent runtime, ZCode refreshes the affected skills and sessions automatically after you enable or disable a plugin so the change takes effect. Disabling a plugin removes all of its components from the session immediately; re-enabling it restores them.
Disable or uninstall? Disabling just takes a plugin out of service and you can switch it back on at any time; uninstalling removes it from the list. Built-in plugins ship with the app, so when you uninstall one ZCode records a suppression marker — an app upgrade won't bring it back. Reinstall it from the marketplace whenever you want it again.
Plugins installed locally don't follow you into a remote workspace by default. Once connected over SSH or WSL, use Sync Plugin in the workspace header's Sync dropdown — the same entry point sits in the top-right corner of Manage installed — to move them across; see Remote Development → Syncing local configuration to the remote.
Configure Plugins
Some plugins need parameters before they can work — a default device, a toggle, or a path, for example. Open the plugin's details, expand Advanced info at the bottom, and fill in the fields under Configuration. Required fields are marked "Required"; click Save configuration when done.
Fields marked as sensitive (such as API keys) show "This value can be configured once secure storage is connected" and can't be entered in the UI yet. For such plugins, prepare the key at the system level following the plugin's instructions.
Using Installed Plugins
Once a plugin is enabled, its capabilities show up in the corresponding places in the client automatically, with no extra setup:
| Capability | Where to use it |
|---|---|
| Skills | Trigger automatically when relevant; you can also type / in the input box and pick from the Skills group. View them all under the Plugin skills group in Settings -> Skills. |
| Commands | Type / in the input box and pick from the Commands group; search by keyword for commands or skills. |
| Subagents | Can be dispatched automatically to handle tasks during a conversation; view them under the Plugin subagents group in Settings -> Subagents (from plugins, read-only). |
| MCP servers | Shown as Plugin MCP servers under Settings -> MCP, loaded automatically as the plugin is enabled or disabled. |
Develop Your Own Plugin
All you need is JSON and Markdown — no changes to ZCode itself. Once your plugin is ready, add its local directory through Add your own marketplace above and install it right in the client for testing.
What A Plugin Looks Like
A plugin is just a folder: a manifest plugin.json at the root, plus component directories as needed (all optional).
my-plugin/
├── .zcode-plugin/
│   └── plugin.json    Manifest (the only required file)
├── commands/          Slash commands, one .md each
├── skills/            Skills, each subdirectory contains a SKILL.md
├── agents/            Subagent .md files
├── hooks/hooks.json   Hooks
└── .mcp.json          MCP server declarations
The manifest is looked up in priority order: .zcode-plugin/plugin.json (recommended) → .claude-plugin/plugin.json (Claude Code compatible).
How to write the five component types:
| Component | Format and location |
|---|---|
| Commands | commands/*.md, YAML frontmatter + body; use $ARGUMENTS in the body to receive arguments |
| Skills | skills/<name>/SKILL.md; spell out name / description in the frontmatter — the more precise the description, the more reliably it triggers |
| Subagents | agents/*.md; name / description required in the frontmatter, the body is its system prompt |
| Hooks | hooks/hooks.json, run automatically at specific events; enabled and disabled together with the plugin, see Hooks |
| MCP servers | .mcp.json at the root or mcpServers in the manifest; connects external tools, server keys are auto-namespaced to avoid conflicts |
The minimal manifest only needs a name:
{
  "name": "hello-world",
  "version": "0.1.0",
  "description": "My first plugin"
}
plugin.json Field Reference
| Field | Required | Meaning |
|---|---|---|
name | ✅ | Plugin name, must match ^[a-z0-9][a-z0-9._-]{0,127}$ (starts with a lowercase letter / digit, may contain . _ -, 1–128 chars) |
version | Version, defaults to 0.0.0; semantic versioning recommended | |
description | One-line description shown in the plugin management UI | |
author | Author, either a string or an object { name, email, url } | |
homepage / repository | Homepage and repository URLs | |
license | License, e.g. MIT | |
keywords | Array of keywords | |
commands / skills / hooks / mcpServers / agents | Component declarations; a directory path string, an array of paths, or an inline object | |
dependencies | Other plugins this one depends on, written as name@market or a bare name within the same marketplace | |
userConfig | User-configurable options (see table below) |
If the manifest contains
channels/lspServers/outputStyles/settings, the current runtime registers but does not execute them — a diagnostic is emitted and other components still load.
Each entry in userConfig shows up in the Configuration area of the plugin detail dialog for the user to fill in:
| Field | Meaning |
|---|---|
type | Type: string / number / boolean / directory / file |
title | Title shown in the UI |
description | Description of the option |
default | Default value |
required | Boolean; required fields are marked "Required" in the UI |
sensitive | Boolean; sensitive values are masked and cannot be entered in the UI yet |
Sensitive (sensitive) values can be referenced in MCP declarations with ${user_config.key}.
marketplace.json Field Reference
A plugin marketplace is a catalog manifest that tells the client which plugins are available and where they live.
Top-level fields:
| Field | Required | Meaning |
|---|---|---|
name | ✅ | Marketplace name; same naming rules as plugin names |
description | Marketplace description | |
plugins | ✅ | Array of plugin entries (see table below) |
pluginRoot | Base directory used to resolve each entry's source, relative to the marketplace root | |
allowCrossMarketplaceDependenciesOn | Array of marketplace names allowed for cross-marketplace dependencies |
Each entry in plugins[]:
| Field | Required | Meaning |
|---|---|---|
name | ✅ | Plugin name |
source | Where the plugin code lives. Most commonly a relative path string; can also be an object (see table below) | |
description / version | Display description and version | |
category / tags | Category (string) and tags (string array) for discovery | |
dependencies | Other plugins this one depends on, written as name@market or a bare name within the same marketplace | |
strict | Boolean; apply stricter validation to this entry |
The different ways to write source:
| Form | Meaning |
|---|---|
"./plugins/hello" | Most common. A subdirectory relative to the marketplace root (plugin lives in the same repo) |
{ "source": "directory", "path": "/abs/path" } | Local absolute directory path |
{ "source": "github", "repo": "owner/repo", "path": "subdir", "ref": "main" } | Fetch from a GitHub repository, with optional subdirectory and branch |
{ "source": "git", "url": "https://...git", "path": "subdir", "ref": "..." } | Fetch from any Git repository |
{ "source": "file", "path": "..." } | Read a local manifest file |
{ "source": "url", "url": "https://.../marketplace.json" } | An HTTP address pointing to a JSON file; supports headers |
{ "source": "npm", "package": "..." } | Fetch from an npm package |
Command .md Field Reference
The frontmatter of commands/*.md supports the following fields:
| Field | Required | Meaning |
|---|---|---|
description | ✅ | Command description (or a non-empty body is enough) |
argument-hint | Argument hint, e.g. "[topic]" | |
allowed-tools | Comma-separated; restricts which tools the command may use | |
model | Overrides the default model | |
skills | Comma-separated; skills to mount automatically | |
disable-noninteractive | Boolean; disable this command in non-interactive mode |
In the body, $ARGUMENTS stands for all user-provided arguments, and $1 / $2 are positional arguments. The command name comes from the file name and must match ^[a-z0-9][a-z0-9_:-]{0,63}$.
Skill SKILL.md Field Reference
The frontmatter of skills/<name>/SKILL.md supports the following fields:
| Field | Required | Meaning |
|---|---|---|
name | ✅ | Skill name; defaults to the directory name |
description | ✅ | Trigger description — spell out "when to use it"; up to 1024 chars, the more precise the more reliably it auto-triggers |
when_to_use | Additional trigger-timing description | |
license | License | |
metadata | Object; may hold extras such as author / version |
Other non-allowlisted fields (such as homepage) are ignored and do not affect loading.
Complete JSON Examples
plugin.json (all fields)
{
  "name": "ios-simulator",
  "version": "1.2.0",
  "description": "iOS simulator dev loop: skills + commands + MCP + hooks",
  "author": { "name": "Your Name", "email": "you@example.com", "url": "https://example.com" },
  "homepage": "https://example.com/ios-simulator",
  "repository": "https://github.com/your-team/ios-simulator",
  "license": "MIT",
  "keywords": ["ios", "simulator", "mobile"],
  "commands": "commands",
  "skills": ["skills", "extra-skills"],
  "agents": "agents",
  "hooks": "hooks/hooks.json",
  "mcpServers": ".mcp.json",
  "dependencies": ["skill-creator@zcode-plugins-official"],
  "userConfig": {
    "api_key": {
      "title": "API key",
      "description": "Used to access a third-party service",
      "type": "string",
      "required": true,
      "sensitive": true
    },
    "default_device": { "title": "Default device", "type": "string", "default": "iPhone 16" },
    "max_retries": { "type": "number", "default": 3 },
    "verbose": { "type": "boolean", "default": false },
    "workspace_dir": { "type": "directory" },
    "config_file": { "type": "file" }
  }
}
commands / skills / hooks / mcpServers / agents accept any of three forms — a directory string (like "commands"), an array of paths (like ["skills", "extra-skills"]), or an inline object. The example above demonstrates the string, array, and file-path forms.
marketplace.json (all fields + every source form)
{
  "name": "my-market",
  "description": "Internal team plugin marketplace",
  "pluginRoot": "plugins",
  "allowCrossMarketplaceDependenciesOn": ["zcode-plugins-official"],
  "plugins": [
    {
      "name": "hello-world",
      "source": "./hello-world",
      "description": "A greeting plugin",
      "version": "0.1.0",
      "category": "demo",
      "tags": ["starter", "demo"],
      "strict": true
    },
    {
      "name": "from-github",
      "source": { "source": "github", "repo": "your-team/another", "path": "plugins/x", "ref": "main" },
      "dependencies": ["hello-world", "skill-creator@zcode-plugins-official"]
    },
    {
      "name": "from-git",
      "source": { "source": "git", "url": "https://git.example.com/x.git", "path": "sub", "ref": "v1.0" }
    },
    {
      "name": "from-dir",
      "source": { "source": "directory", "path": "/abs/path/to/plugin" }
    },
    {
      "name": "from-url",
      "source": { "source": "url", "url": "https://example.com/plugin-manifest.json", "headers": { "Authorization": "Bearer xxx" } }
    },
    {
      "name": "from-npm",
      "source": { "source": "npm", "package": "@scope/plugin" }
    }
  ]
}
With pluginRoot set, relative source values (like "./hello-world") resolve against it — i.e. plugins/hello-world.
hooks/hooks.json
{
  "hooks": {
    "SessionStart": [
      {
        "matcher": "startup|clear|compact",
        "hooks": [
          {
            "type": "command",
            "command": "\"${CLAUDE_PLUGIN_ROOT}/hooks/run.sh\" start",
            "async": false,
            "shell": true,
            "timeout": 30,
            "statusMessage": "Initializing…"
          }
        ]
      }
    ],
    "PreToolUse": [
      {
        "matcher": "Bash",
        "hooks": [
          {
            "type": "process",
            "command": "node",
            "args": ["${CLAUDE_PLUGIN_ROOT}/hooks/check.js"],
            "timeoutMs": 5000,
            "statusMessage": "Checking command…"
          }
        ]
      }
    ],
    "PostToolUse": [
      { "hooks": [ { "type": "command", "command": "echo done" } ] }
    ],
    "Stop": [
      { "hooks": [ { "type": "command", "command": "\"${CLAUDE_PLUGIN_ROOT}/hooks/cleanup.sh\"", "async": true } ] }
    ]
  }
}
Seven events are currently supported: SessionStart, UserPromptSubmit, PreToolUse, PermissionRequest, PostToolUse, PostToolUseFailure, and Stop. Each event holds an array of matcher groups; process executes via argv, while command hands a shell string to the system shell and supports async. The standard location hooks/hooks.json is discovered automatically — do not point the manifest at the same file again. Plugin hooks only join new sessions after the plugin is enabled; see Hooks for the full semantics.
.mcp.json (stdio + http + sse)
{
  "mcpServers": {
    "ios-simulator": {
      "type": "stdio",
      "command": "node",
      "args": ["${CLAUDE_PLUGIN_ROOT}/dist/mcp/server.js"],
      "cwd": "${CLAUDE_PROJECT_DIR}",
      "env": {
        "IOS_SIM_ROOT": "${CLAUDE_PLUGIN_ROOT}",
        "IOS_SIM_DEVICE": "${user_config.default_device}"
      },
      "enabled": true,
      "timeoutMs": 60000
    },
    "remote-http": {
      "type": "http",
      "url": "https://mcp.example.com/api",
      "headers": { "Authorization": "Bearer ${user_config.api_key}" },
      "enabled": true,
      "timeoutMs": 30000
    },
    "remote-sse": {
      "type": "sse",
      "url": "https://mcp.example.com/sse",
      "headers": { "X-Token": "${user_config.api_key}" }
    }
  }
}
type can be omitted — with a command it defaults to stdio, with a url it defaults to http. Available template variables:
| Variable | Meaning |
|---|---|
${CLAUDE_PLUGIN_ROOT} | Plugin root directory; ${ZCODE_PLUGIN_ROOT} also works |
${CLAUDE_PLUGIN_DATA} | Plugin data directory |
${CLAUDE_PROJECT_DIR} | Current working directory |
${user_config.key} | References the value of the matching userConfig entry |
Server keys are automatically namespaced as plugin:<plugin-name>:<server-name> to avoid conflicts.
Test Locally In The Client
- Build the plugin directory locally, then write a
marketplace.jsonwhoseplugins[].sourcepoints at the plugin directory with a relative path. - Open Settings -> Plugins, click Create -> Add marketplace in the top-right corner, and enter the directory's local path (the path must exist).
- Find it in the Personal segment, click Install and enable it, then trigger its components in a conversation to verify. After code changes, refresh that marketplace from the Marketplace sources panel.
Distribute A Marketplace To Your Team
Put plugins under the marketplace repository's plugins/ directory, list them in a marketplace.json at the root, and push to GitHub. Teammates click Create -> Add marketplace, enter the repository address, and get every plugin at once.
The bundled official plugins are the best examples (skill-creator is the simplest; ios-simulator / android-emulator are the most complete). Start with a skills-only plugin, then add commands, hooks, and MCP once it works.
Security note: enabling a plugin grants code-execution trust. Enabled third-party marketplace plugins can run local processes and read the inherited Agent environment variables, just like official ones. Review the source, hooks/hooks.json, and scripts before enabling; disable or uninstall anything you don't trust.