连接模型与套餐
ZCode 支持多种方式接入 GLM 模型用于编程工作流。国内用户推荐通过 GLM Coding Plan(BigModel) 在 ZCode 中运行 GLM-5.2,账号登录即可使用,配置简单。
推荐方式
登录 BigModel 或 Z.ai 账号即可在 ZCode 中使用 GLM 模型。若账号已开通 GLM Coding Plan 编程套餐,ZCode 会直接使用该账号下的套餐与额度。
GLM Coding Plan(BigModel)
适合 GLM-5.2 编程工作流、账号登录即用,以及已开通 GLM Coding Plan 的国内用户。
Z.ai Coding Plan
海外用户推荐:通过 Z.ai 账号运行 GLM-5.2(美元计价),同样享受 GLM Coding Plan 套餐与额度。
Coding Plan 订阅用户专享约 1.5 倍配额。 账号开通 GLM Coding Plan 后,ZCode 会直接使用该套餐额度;活动期内(截至 2026 年 7 月 31 日)通过 Coding Plan 使用 GLM-5.2 时,额度按 0.67 系数折算,等效可用额度约为原来的 1.5 倍,套餐更耐用。
其他接入方式
第三方供应商
接入兼容 Anthropic / OpenAI 协议的模型服务,包括团队自建通道。
使用 API Key
如果你自行管理模型访问,可使用 API Key 直接接入模型服务。
配置入口
方式一:首次启动欢迎页
首次打开 ZCode、还没有可用模型时,欢迎页面会直接提供接入选项:
- 连接 Z.ai 继续使用:通过 Z.ai 账号授权登录。
- 连接 BigModel 继续使用:通过智谱 BigModel 账号授权登录。
- 使用 API Key:直接填写 API Key,进入模型供应商配置。
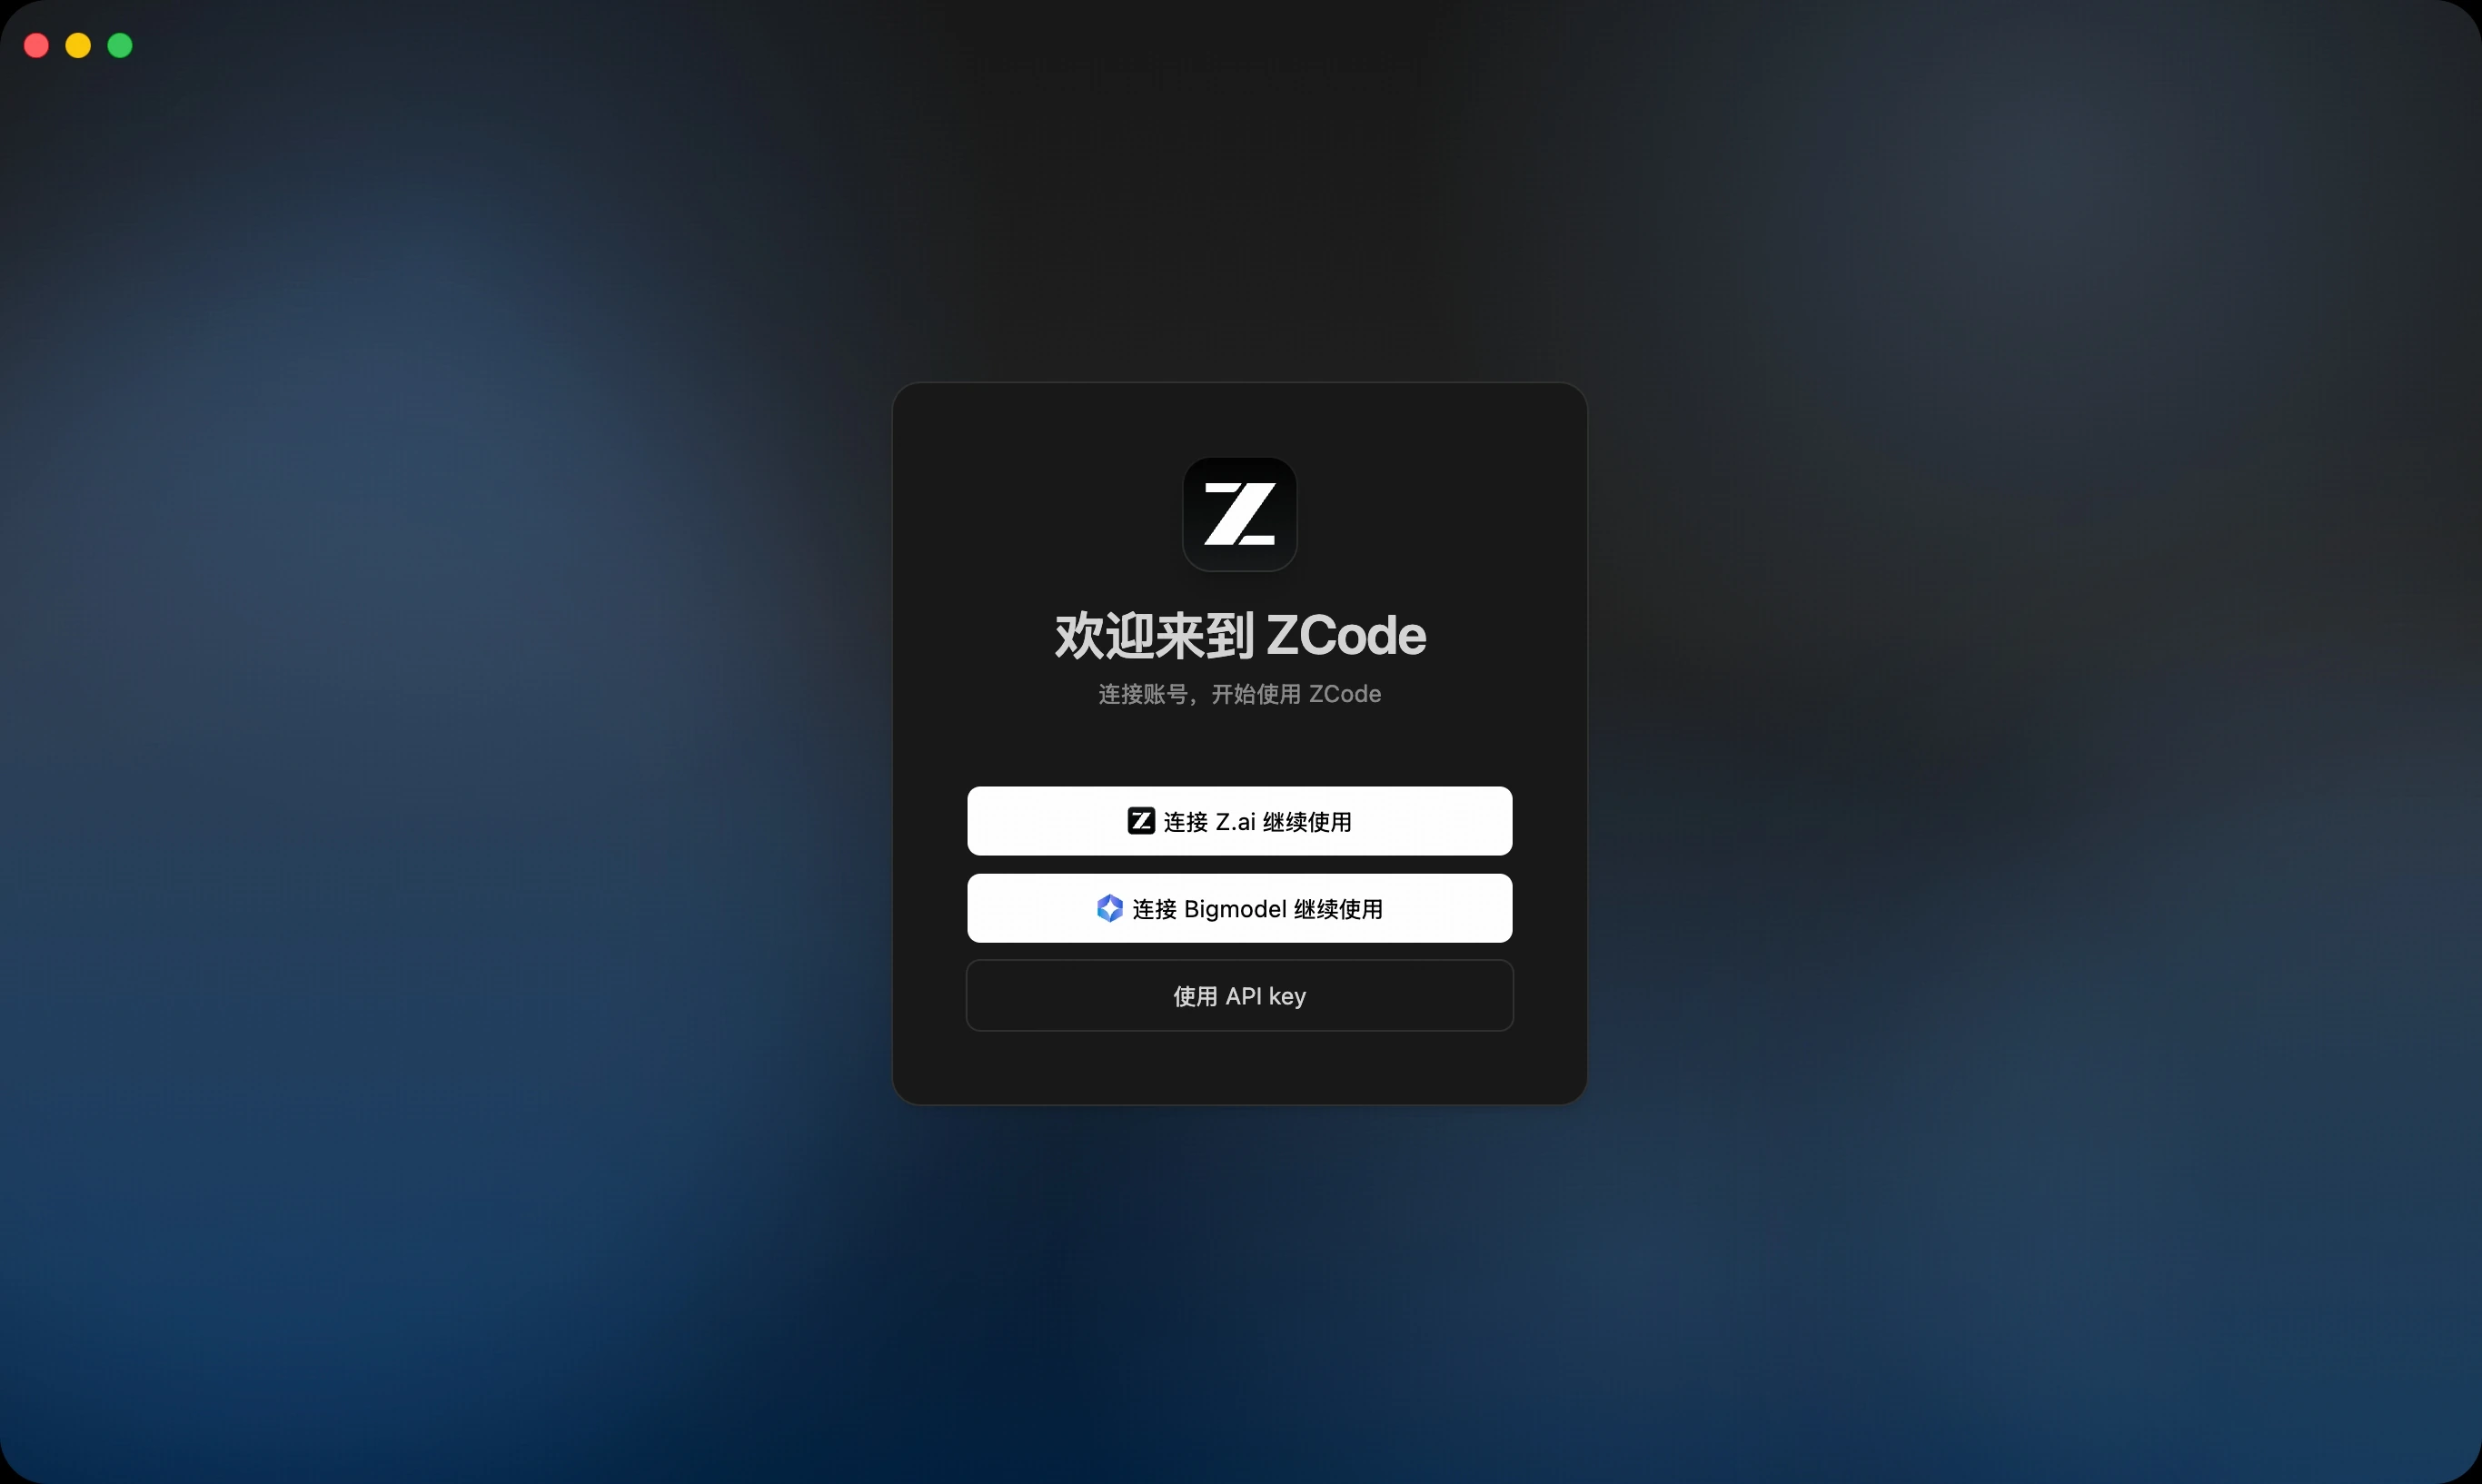
选择「连接 Z.ai」或「连接 BigModel」后,应用会弹出授权窗口并等待平台完成认证,认证通过后即自动绑定账号:

方式二:模型选择器
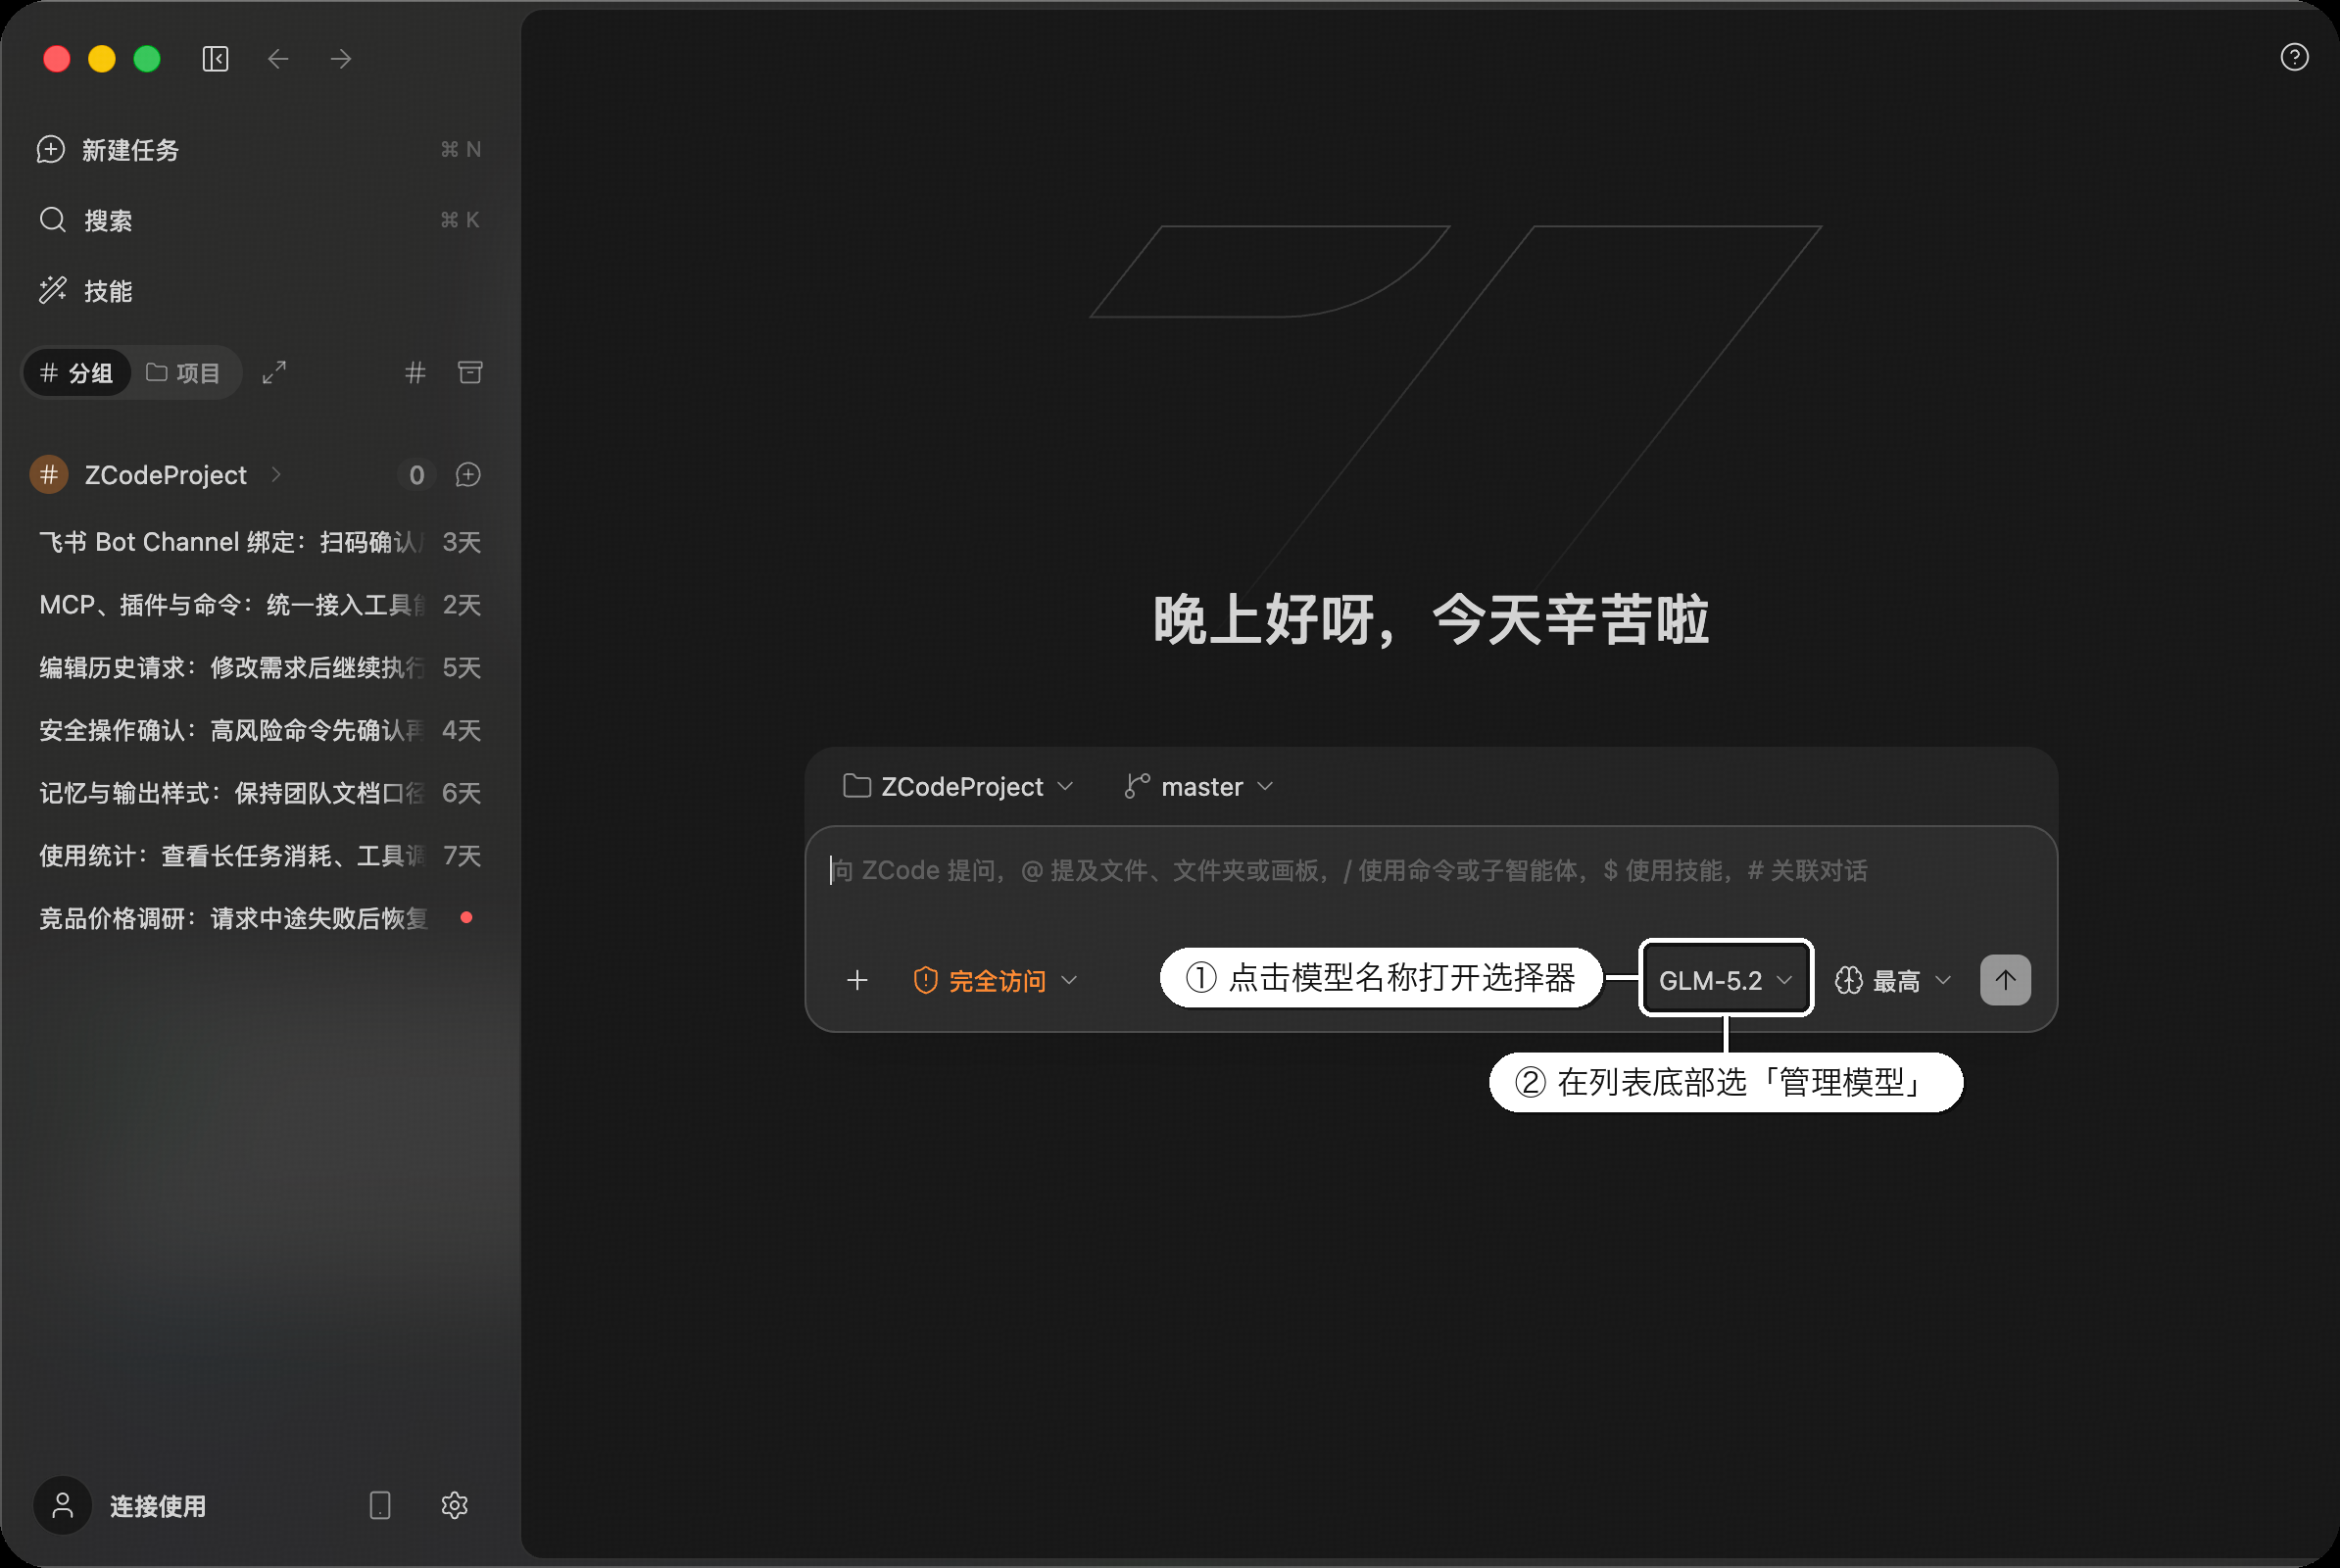
进入 ZCode 后,点击对话框中的模型名称打开模型选择器,在列表底部点击「管理模型」,即可进入 设置 -> 模型设置 面板,管理 ZCode Agent 可用的模型通道。
BigModel(国内)/ Z.ai(海外)API 端点说明
在 BigModel 或 Z.ai 供应商页切换到 API Key 模式后,会出现 OpenAI 接口地址 与 Anthropic 接口地址 两个字段。先选你的账号类型,再按所用平台填写对应地址,并使用对应的 API Key。
GLM Coding Plan 编程套餐
最常用使用已订阅的 Coding Plan 套餐额度,仅限 Coding 场景。
BigModel
Z.ai
资源包 / 充值余额
使用开放平台模型资源包或充值余额等通用 API 场景,填写 OpenAI 接口地址即可。
BigModel
Z.ai
填写须知
- Coding Plan 的 OpenAI 地址必须是 Coding 专用端点(
/api/coding/paas/v4),不要填通用端点/api/paas/v4。 - Coding 端点仅限 Coding 场景,与通用端点不可互相替代,也不会互相消耗额度。
- 若通过右上角 「编程套餐」 授权绑定账号(非 API Key 模式), ZCode 会自动选择正确通道,无需手动填写。
连接 BigModel
- 通过上述任一方式进入 模型设置 面板
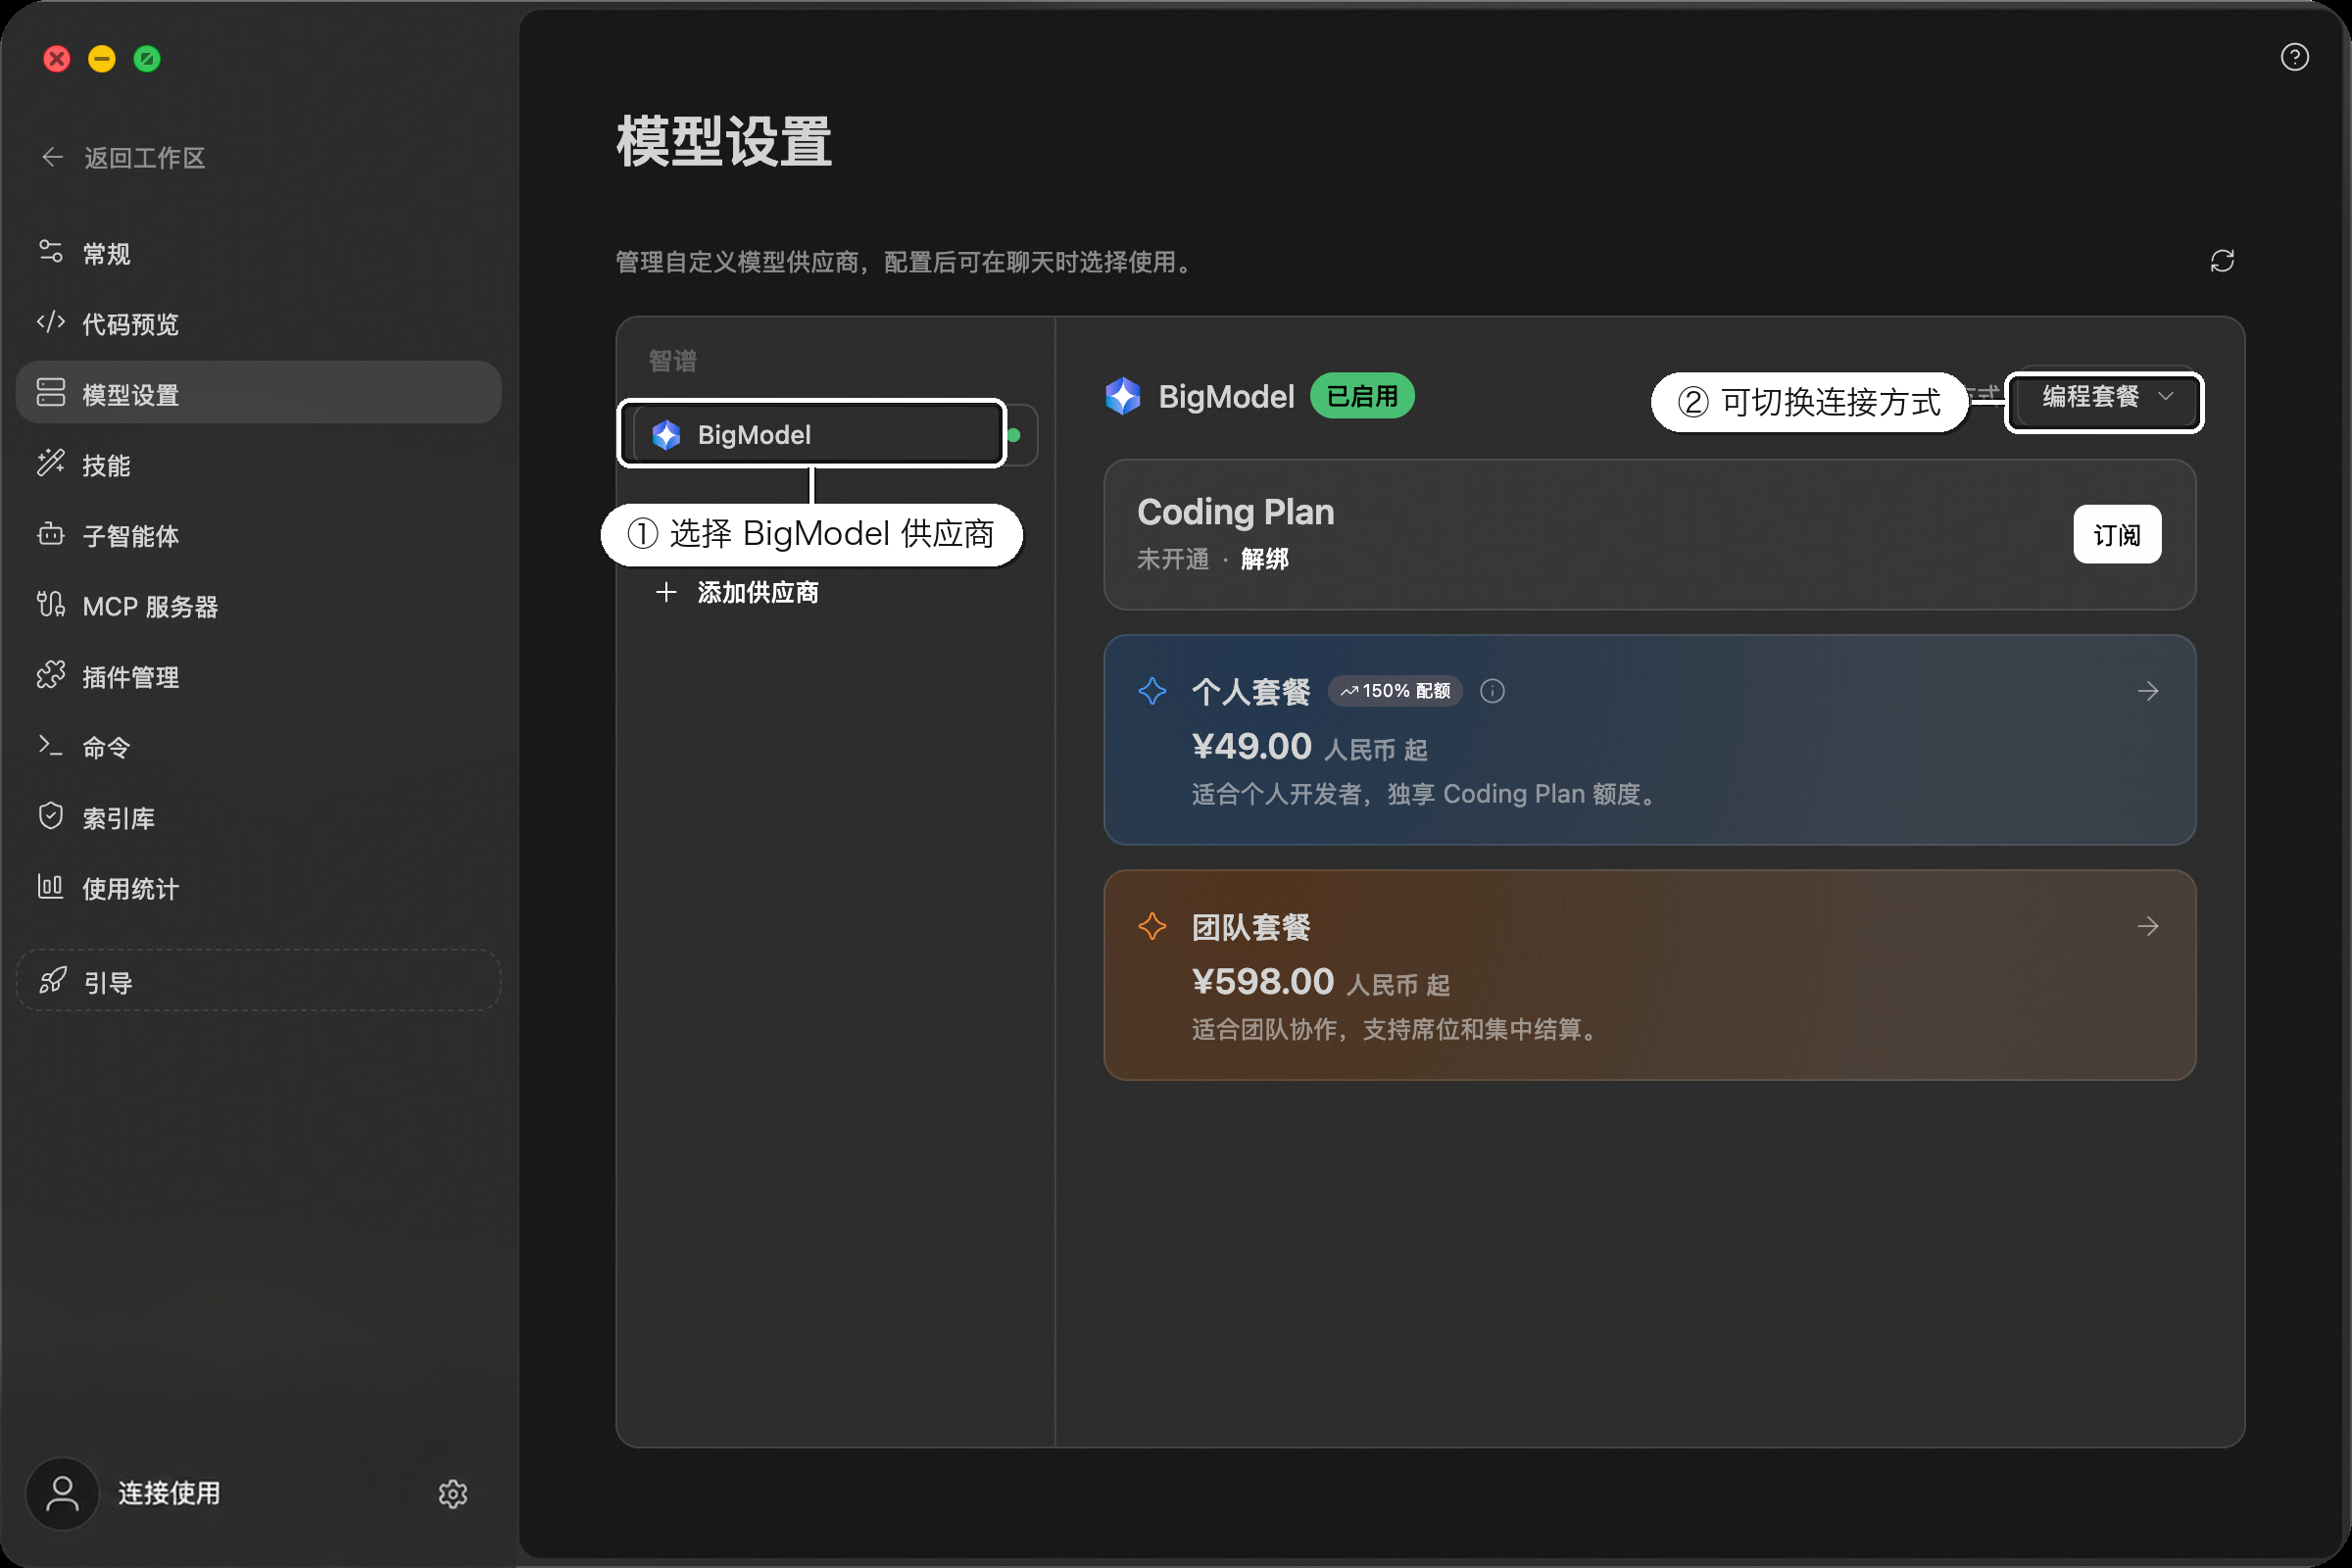
- 在左侧供应商列表中选择「BigModel」
- 完成账号连接并开启启用开关,即可按账号权限使用 GLM-5.2、GLM-5-Turbo 等内置模型
- 右上角可切换连接方式:使用「编程套餐」绑定 GLM Coding Plan,或改用 API Key 接入
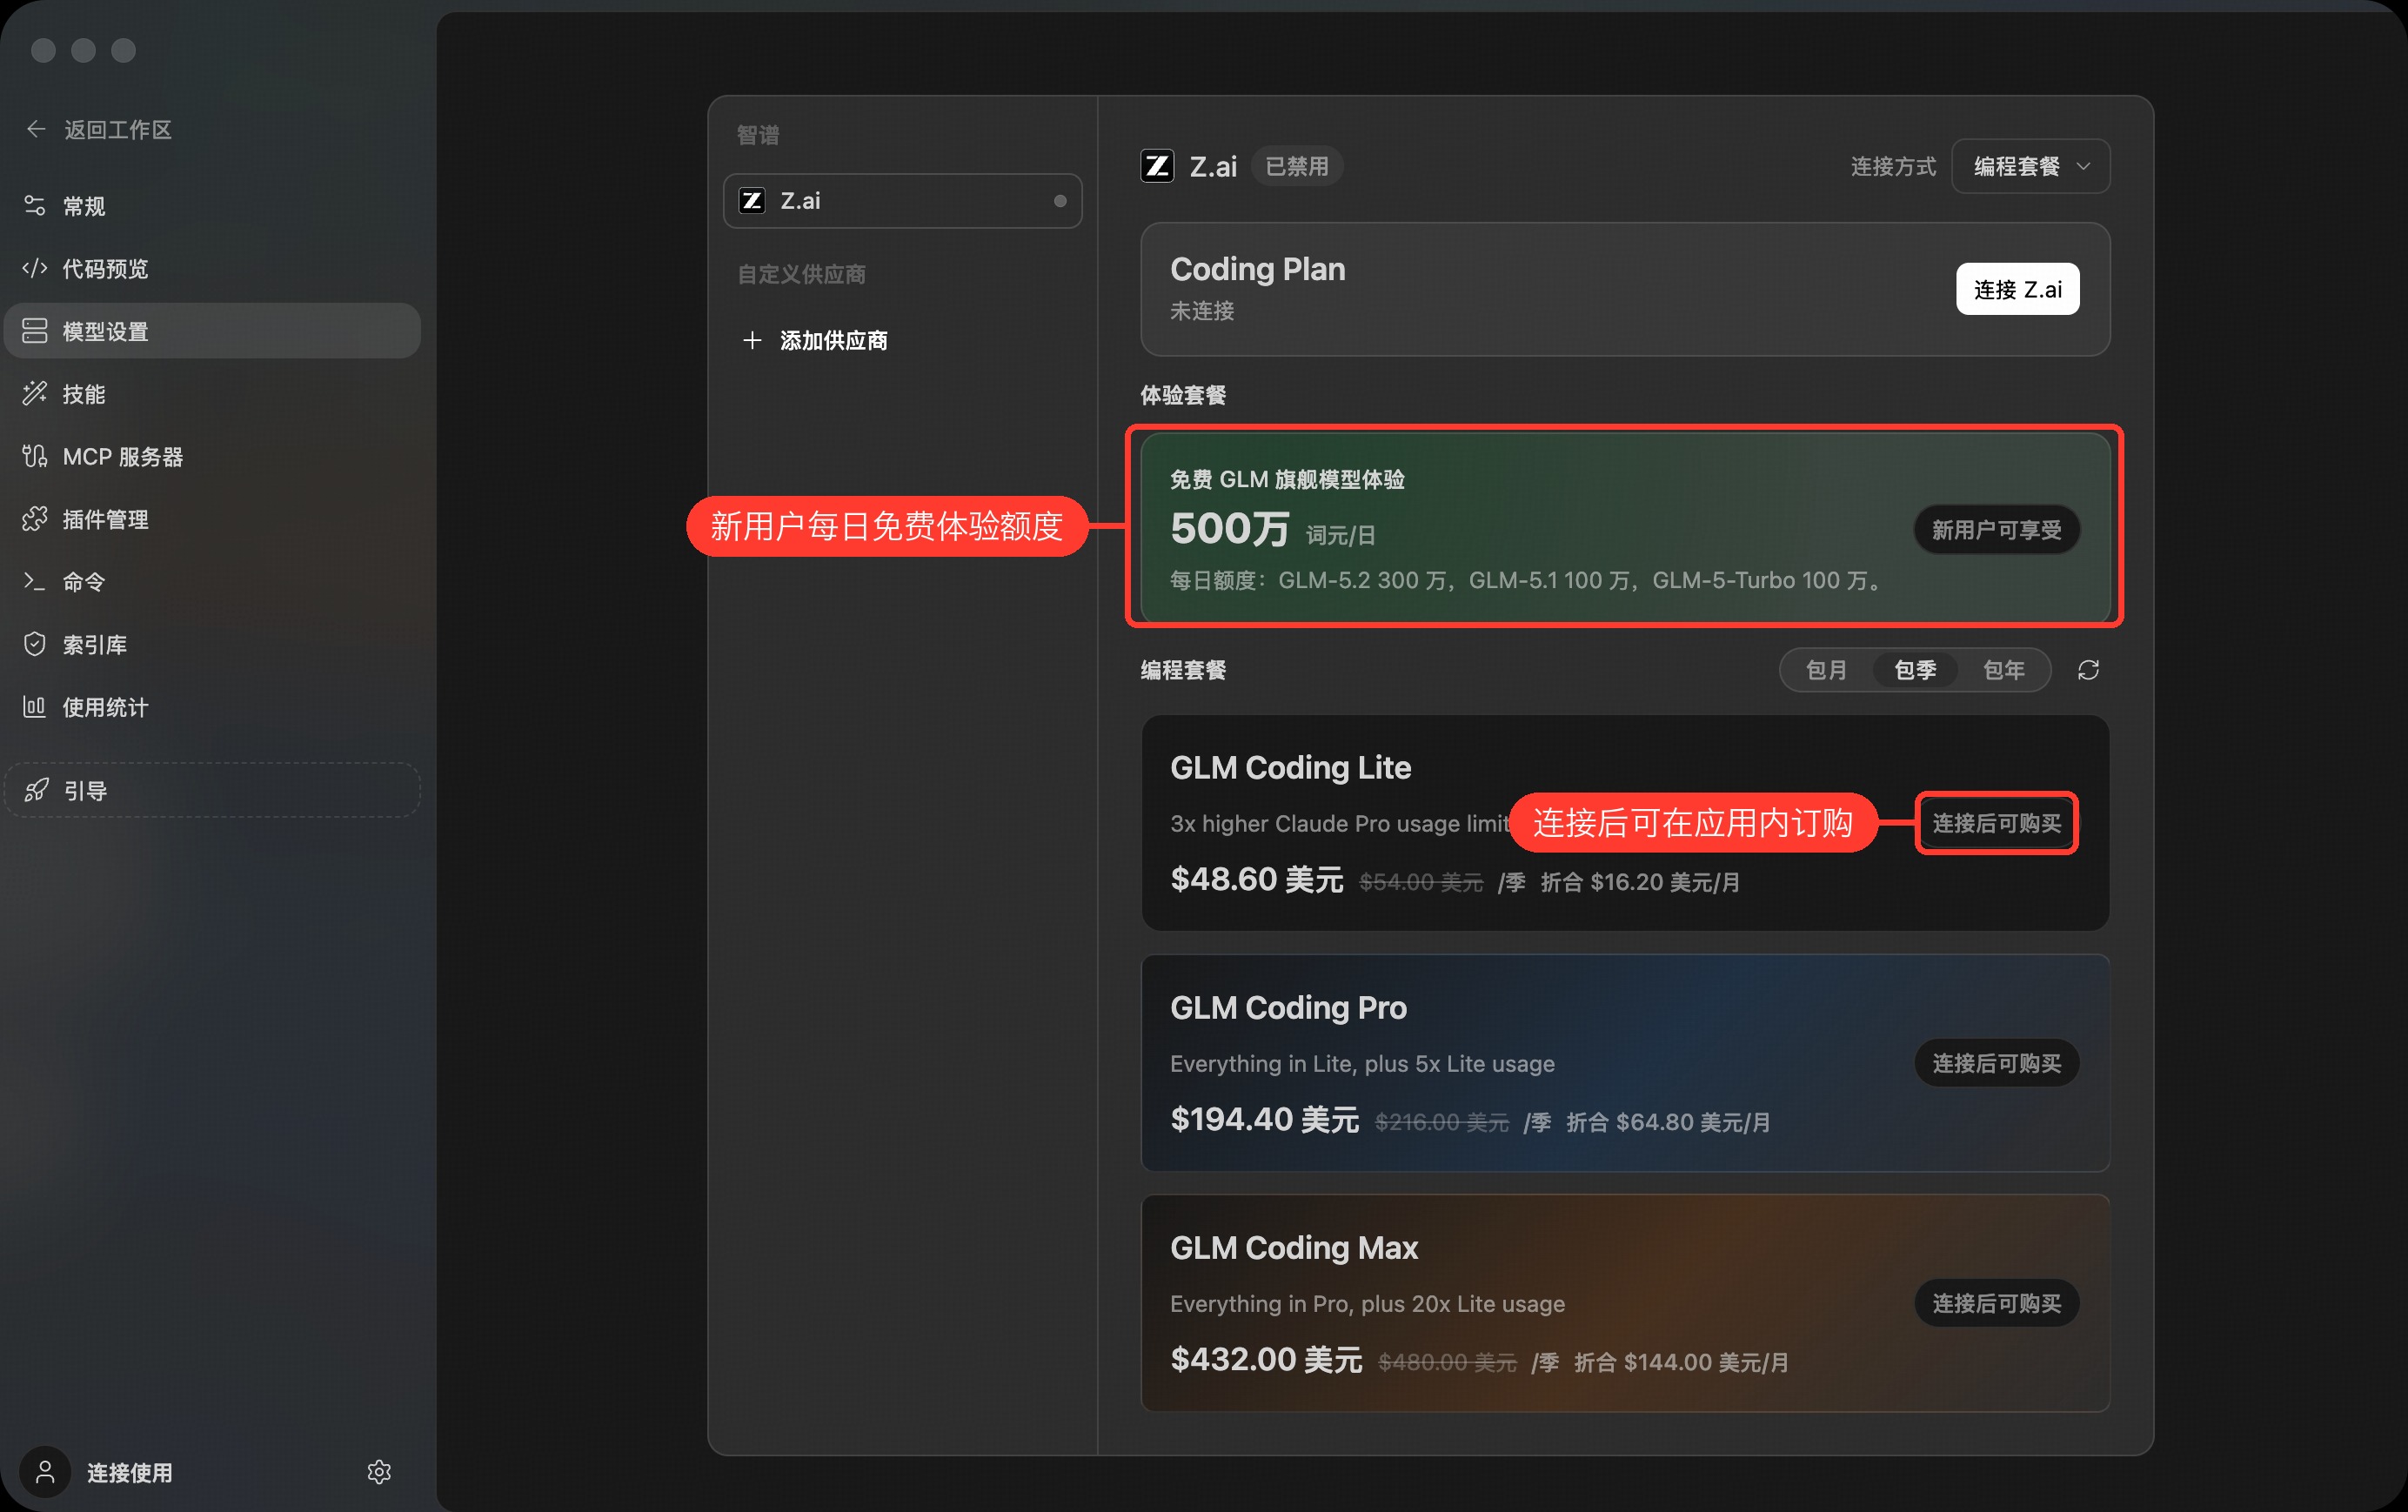
免费体验额度
新用户连接 BigModel 账号后,会自动获得 体验套餐:无需付费,在 首次使用起的 5 天内,每天提供 500 万 token 的 GLM 系列模型体验额度,适合先在真实项目里试用 ZCode Agent,再决定是否升级到 GLM Coding 编程套餐。
注意:体验额度仅限 5 天。每日额度只在这 5 天内发放,体验期结束后即失效,并非长期每天都有。
每日体验额度由两类模型额度组成,供应商页面会分别展示每个模型的今日余额和已用量:
| 模型 | 每日体验额度 |
|---|---|
| GLM-5.2 | 300 万 token / 日 |
| GLM-5-Turbo | 200 万 token / 日 |
体验期内额度每天刷新,具体可用模型、剩余额度与消耗情况以 BigModel 供应商页面实时展示为准。
在 ZCode 内订购编程套餐
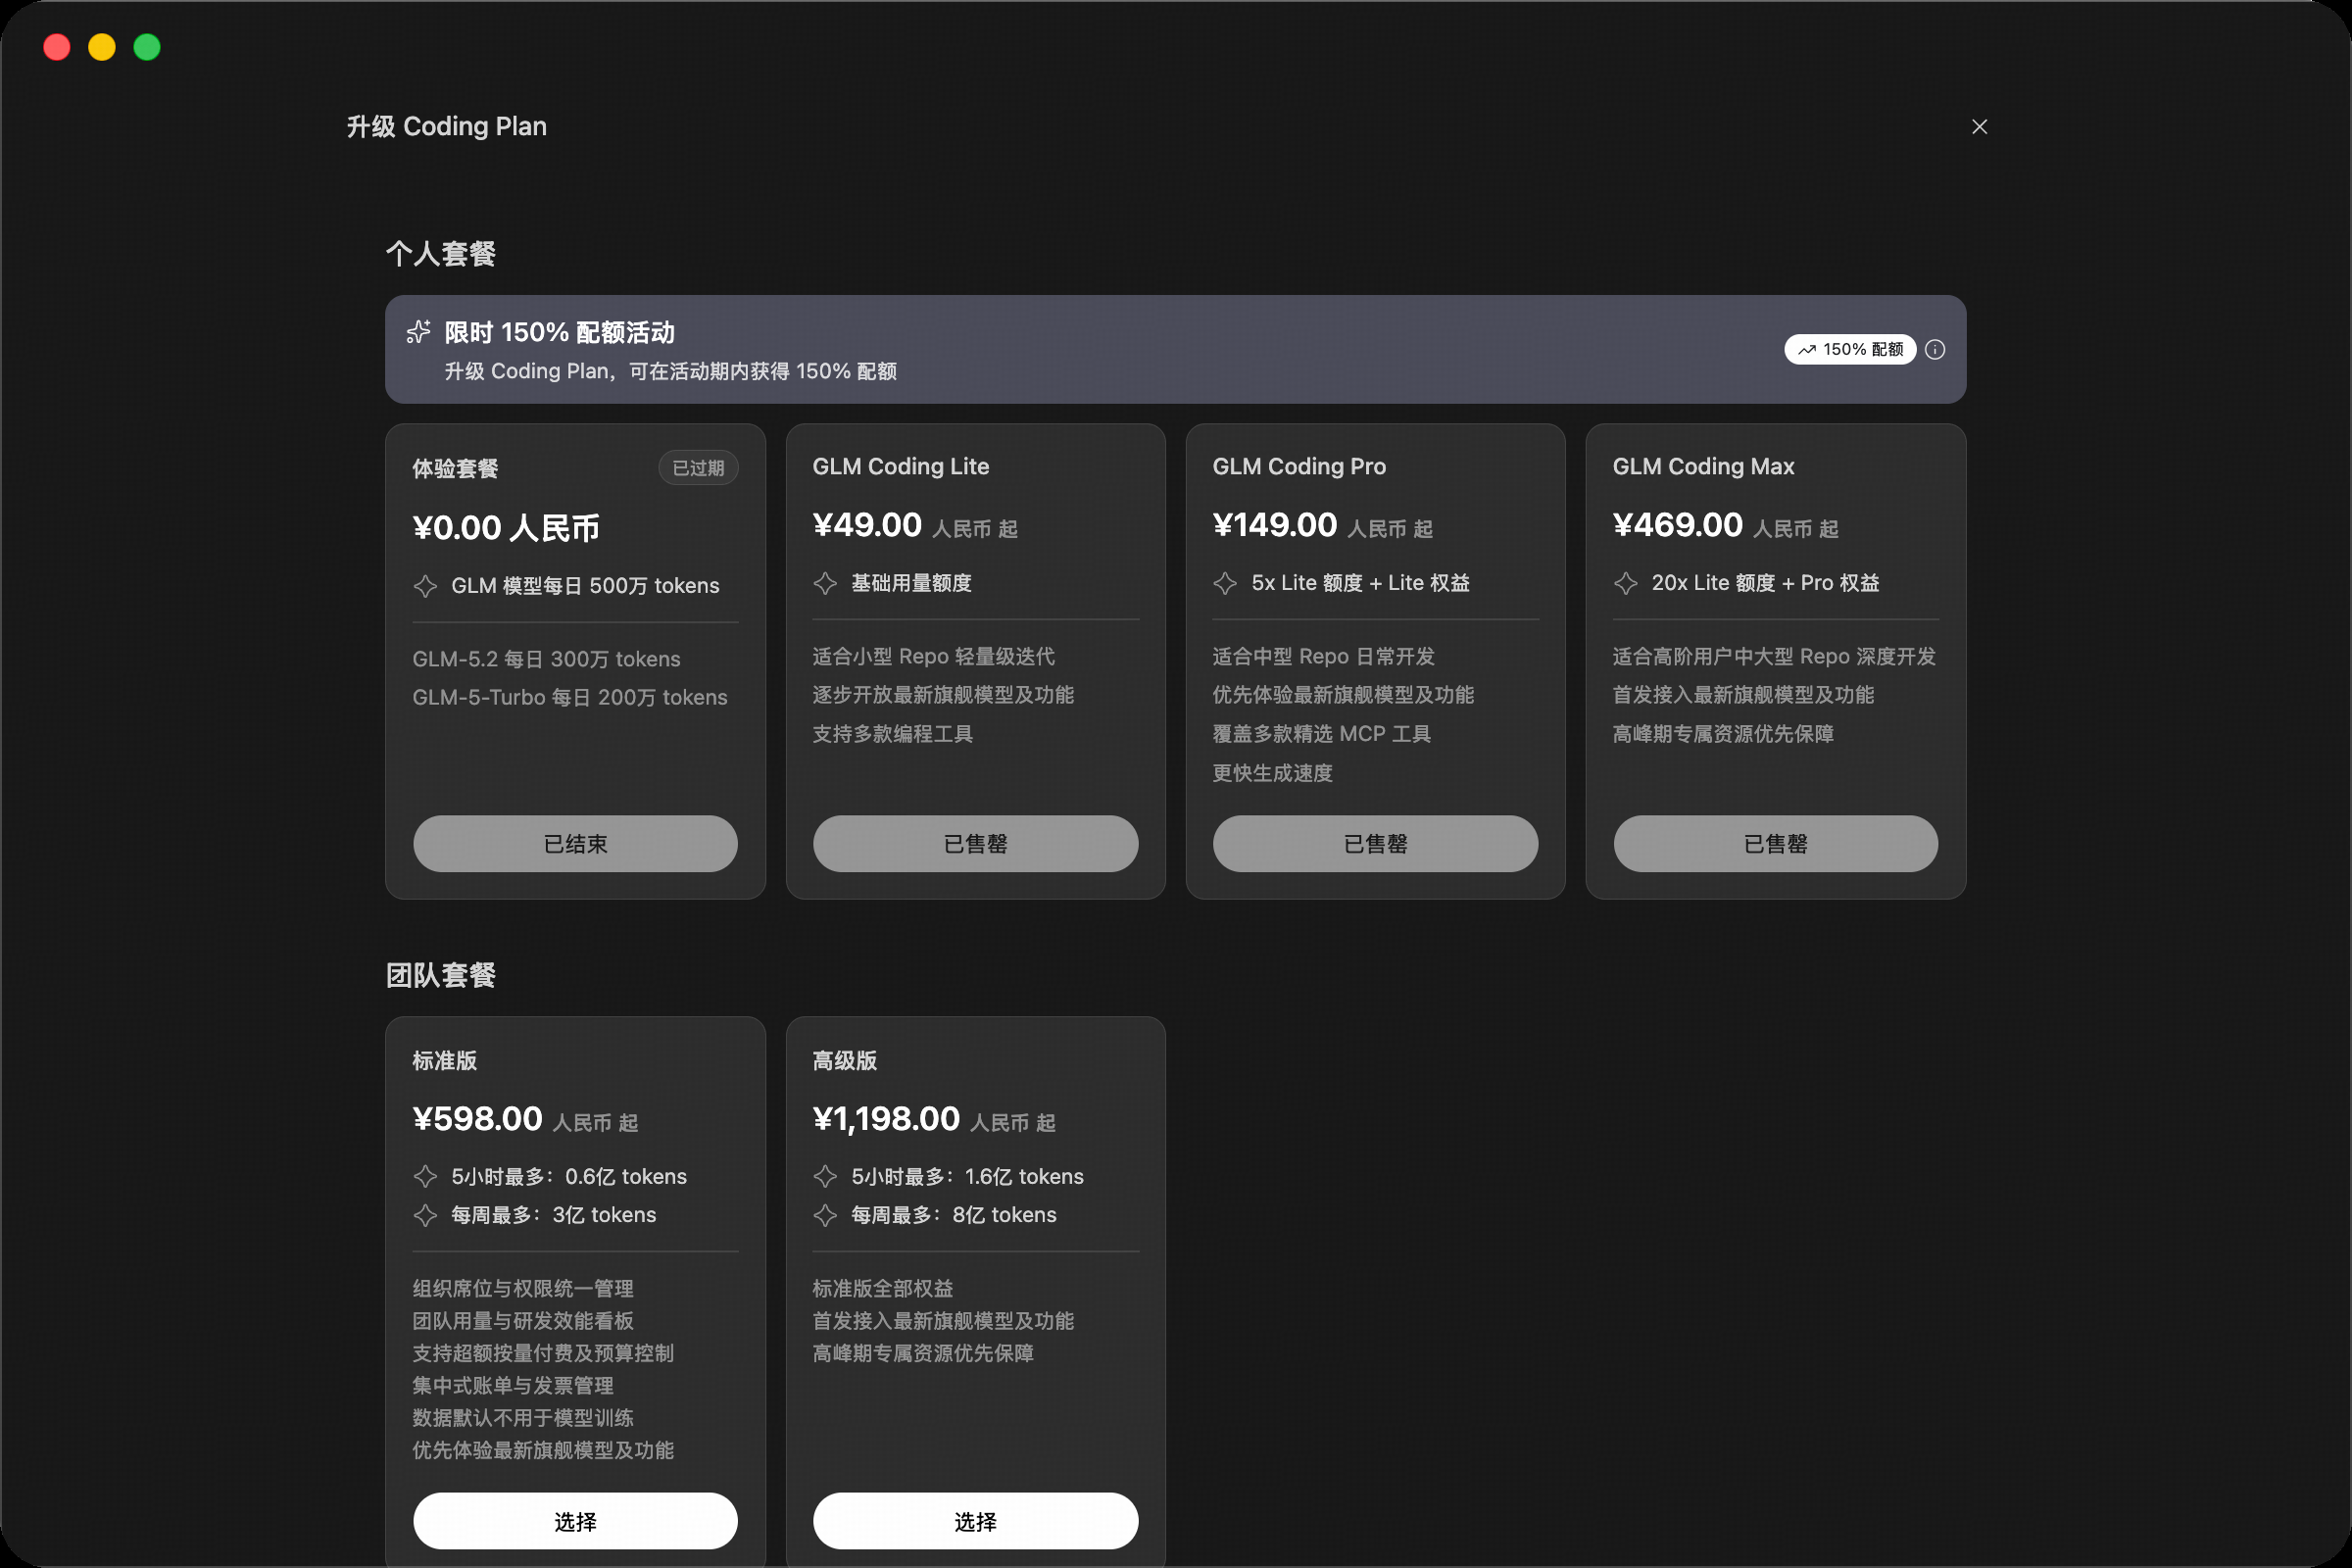
体验额度不够用?不用离开 ZCode:在 BigModel 供应商页面即可浏览 GLM Coding 编程套餐(Lite / Pro / Max),支持包月、包季、包年三种订购方式,登录后直接在应用内完成购买;已订阅用户也能在这里管理当前套餐、查看额度状态。
使用 API Key 接入
根据你的账号类型选择连接方式:
方式 A:GLM Coding Plan(编程套餐 API Key)
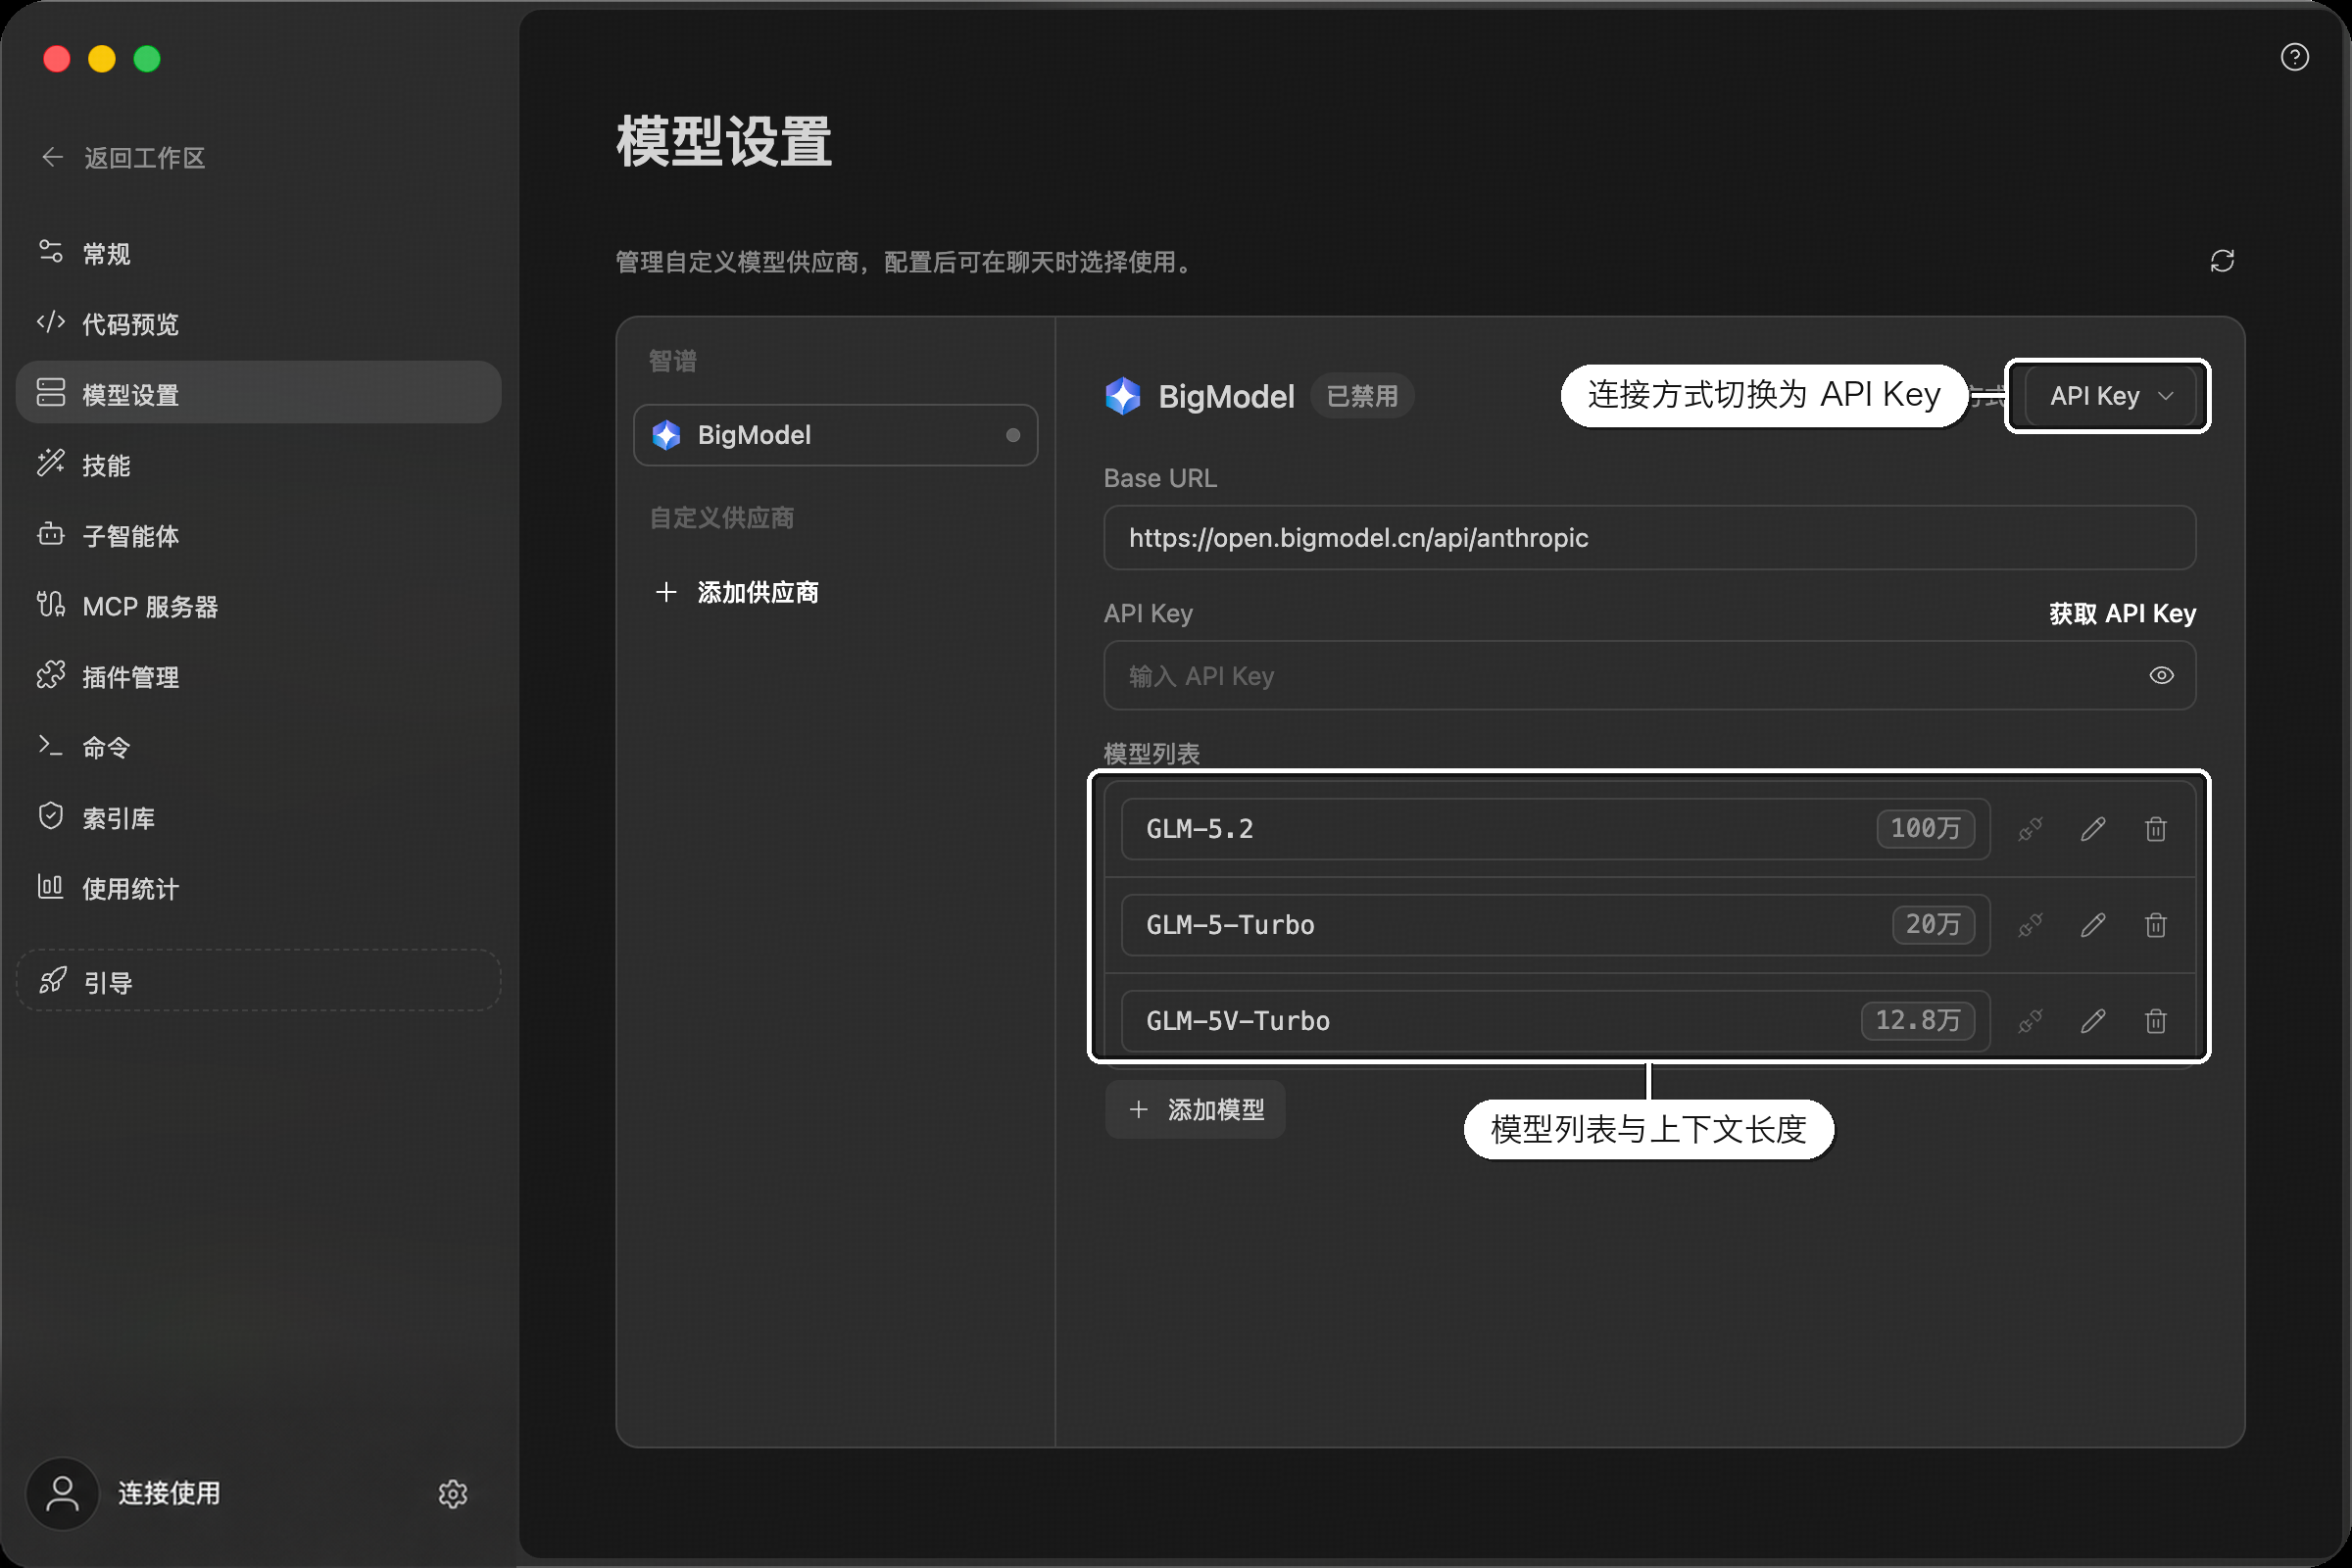
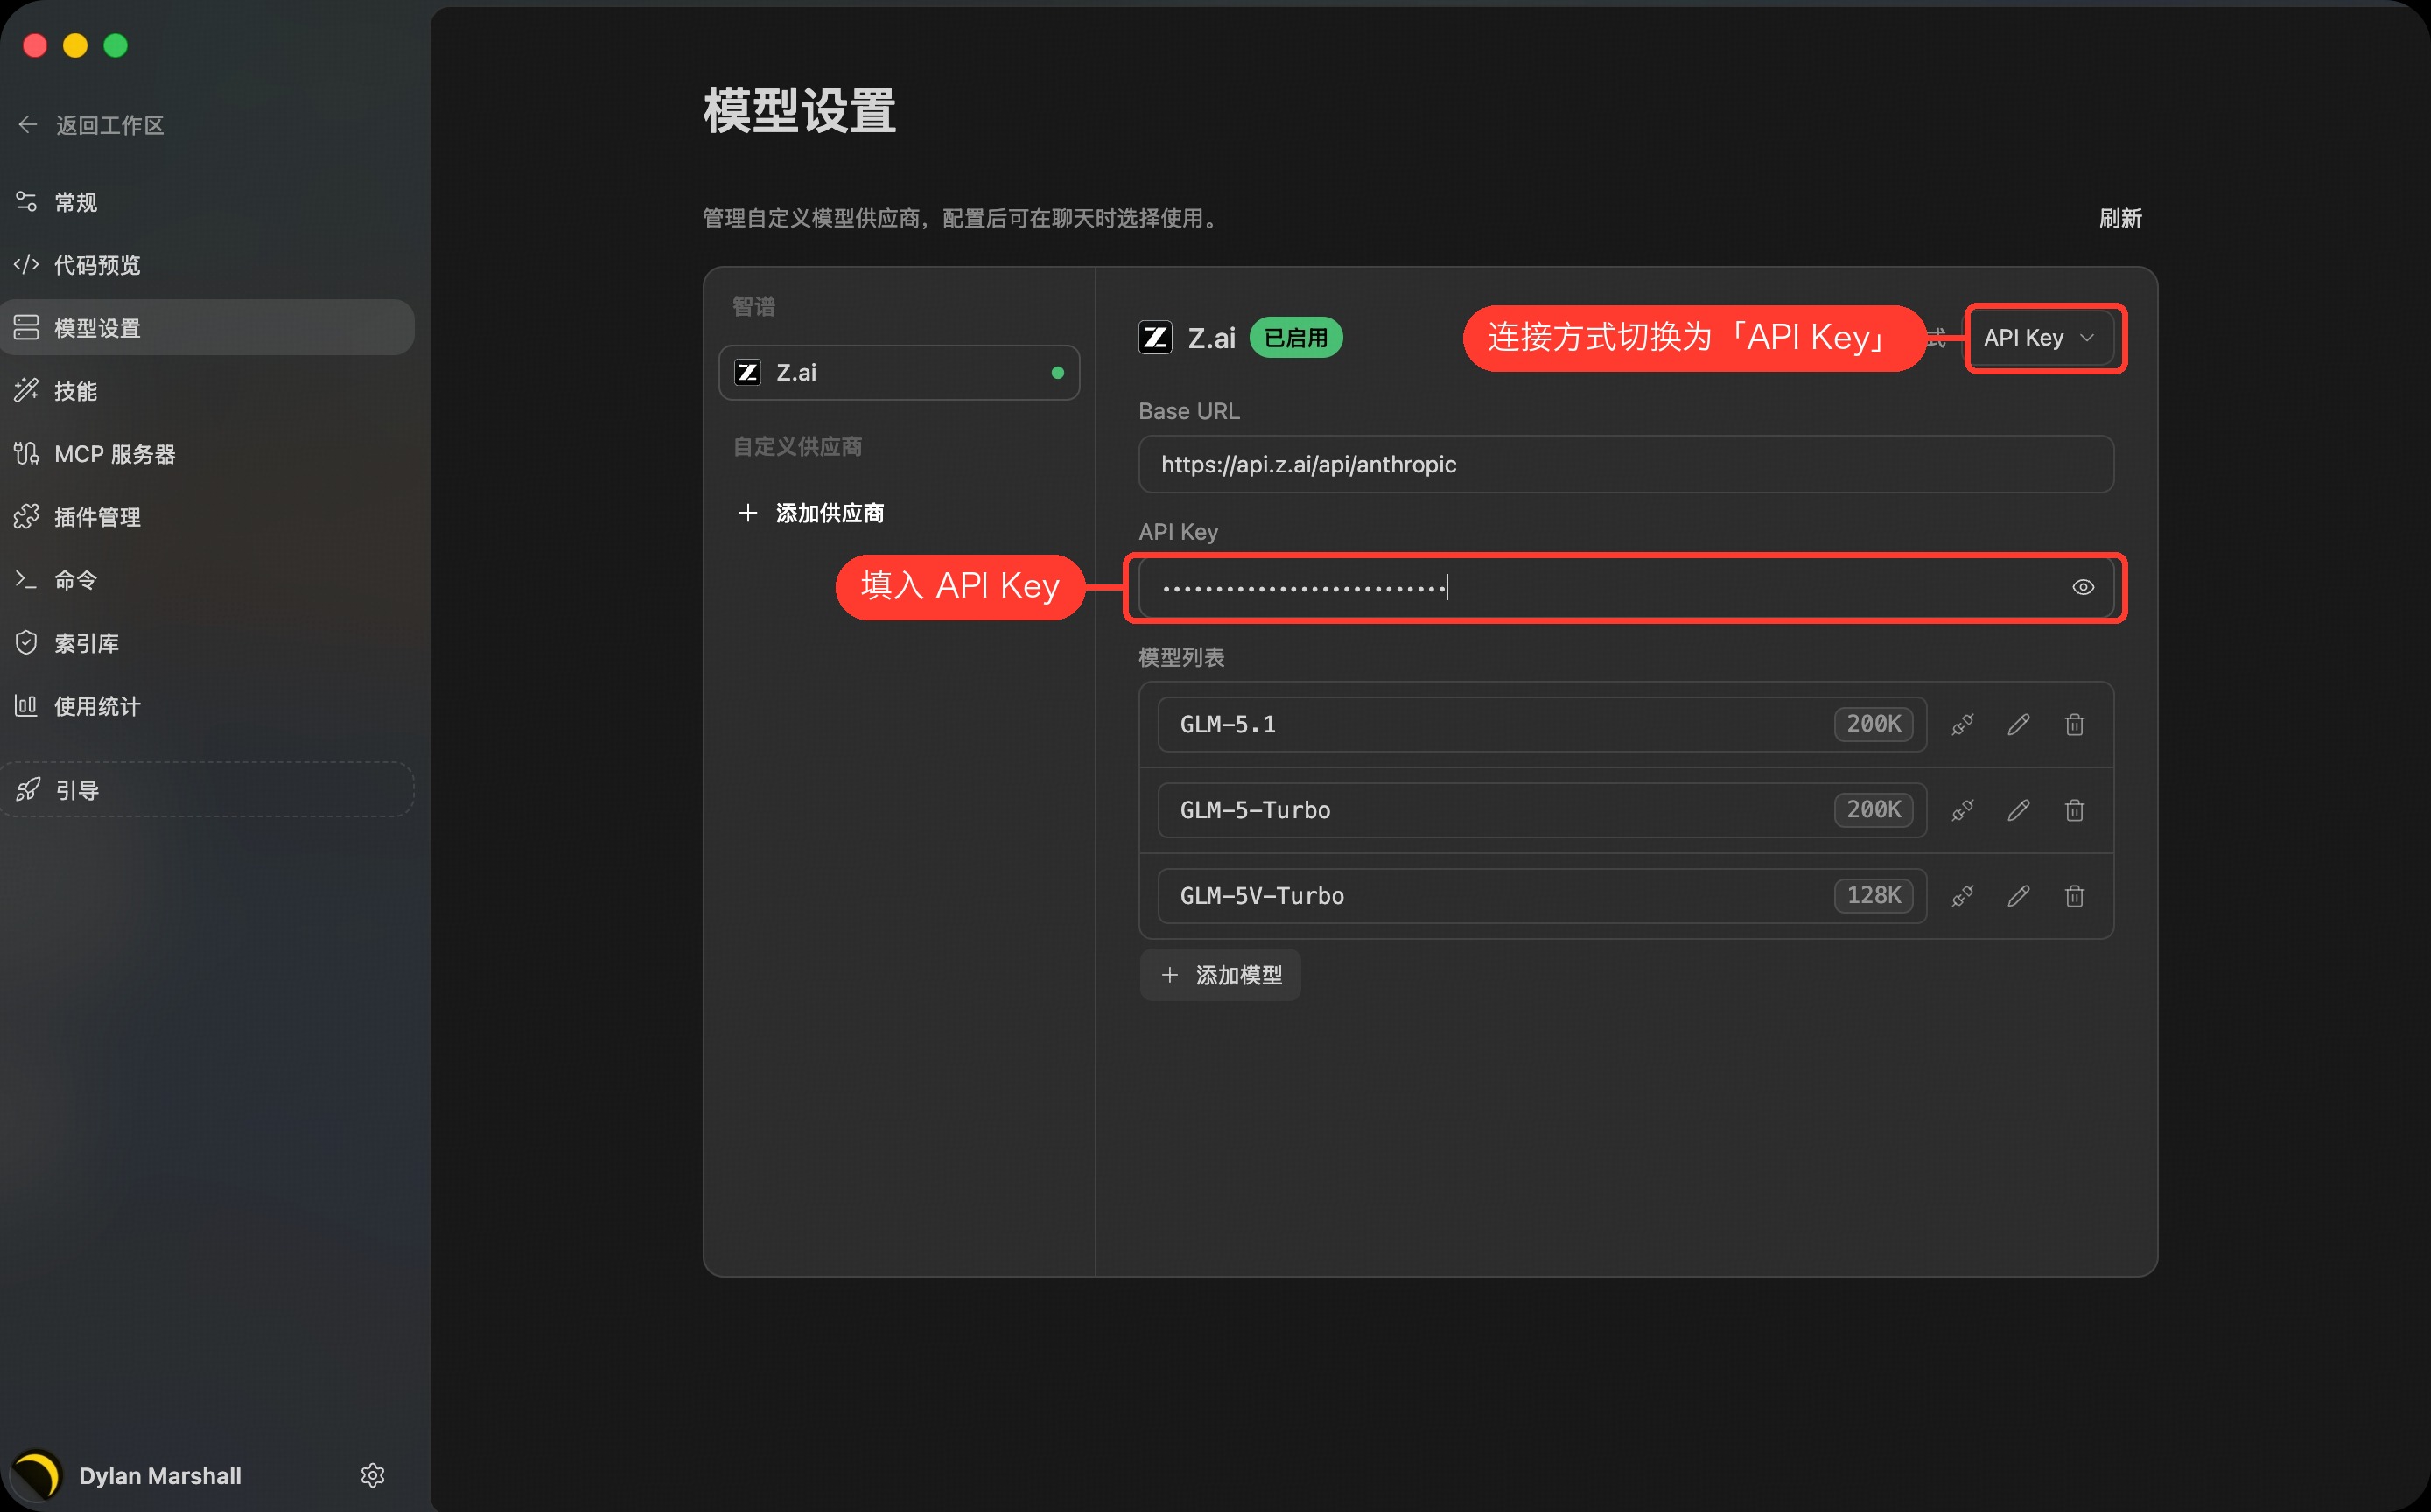
- 在 BigModel 供应商页面右上角,将连接方式切换为「API Key」
- OpenAI 接口地址填写 Coding 专用端点:
https://open.bigmodel.cn/api/coding/paas/v4 - 填入从智谱开放平台获取的 API Key
- 可用模型以账号权限和供应商返回的模型列表为准
注意:Coding 端点不能替换为通用端点
https://open.bigmodel.cn/api/paas/v4。
方式 B:模型资源包 / 充值余额
- 在 BigModel 供应商页面右上角,将连接方式切换为「API Key」
- 任选一种协议:
- Anthropic 协议(默认):Anthropic 接口地址保持
https://open.bigmodel.cn/api/anthropic - OpenAI 协议:OpenAI 接口地址填写
https://open.bigmodel.cn/api/paas/v4
- Anthropic 协议(默认):Anthropic 接口地址保持
- 填入从智谱开放平台获取的 API Key
- 可用模型以账号权限和供应商返回的模型列表为准;也可以点击「添加模型」补充其他可用模型
连接 Z.ai
Z.ai 是面向海外用户的接入方式,配置流程与 BigModel 基本一致:
- 通过上述任一方式进入 模型设置 面板
- 在左侧供应商列表中选择「Z.ai」
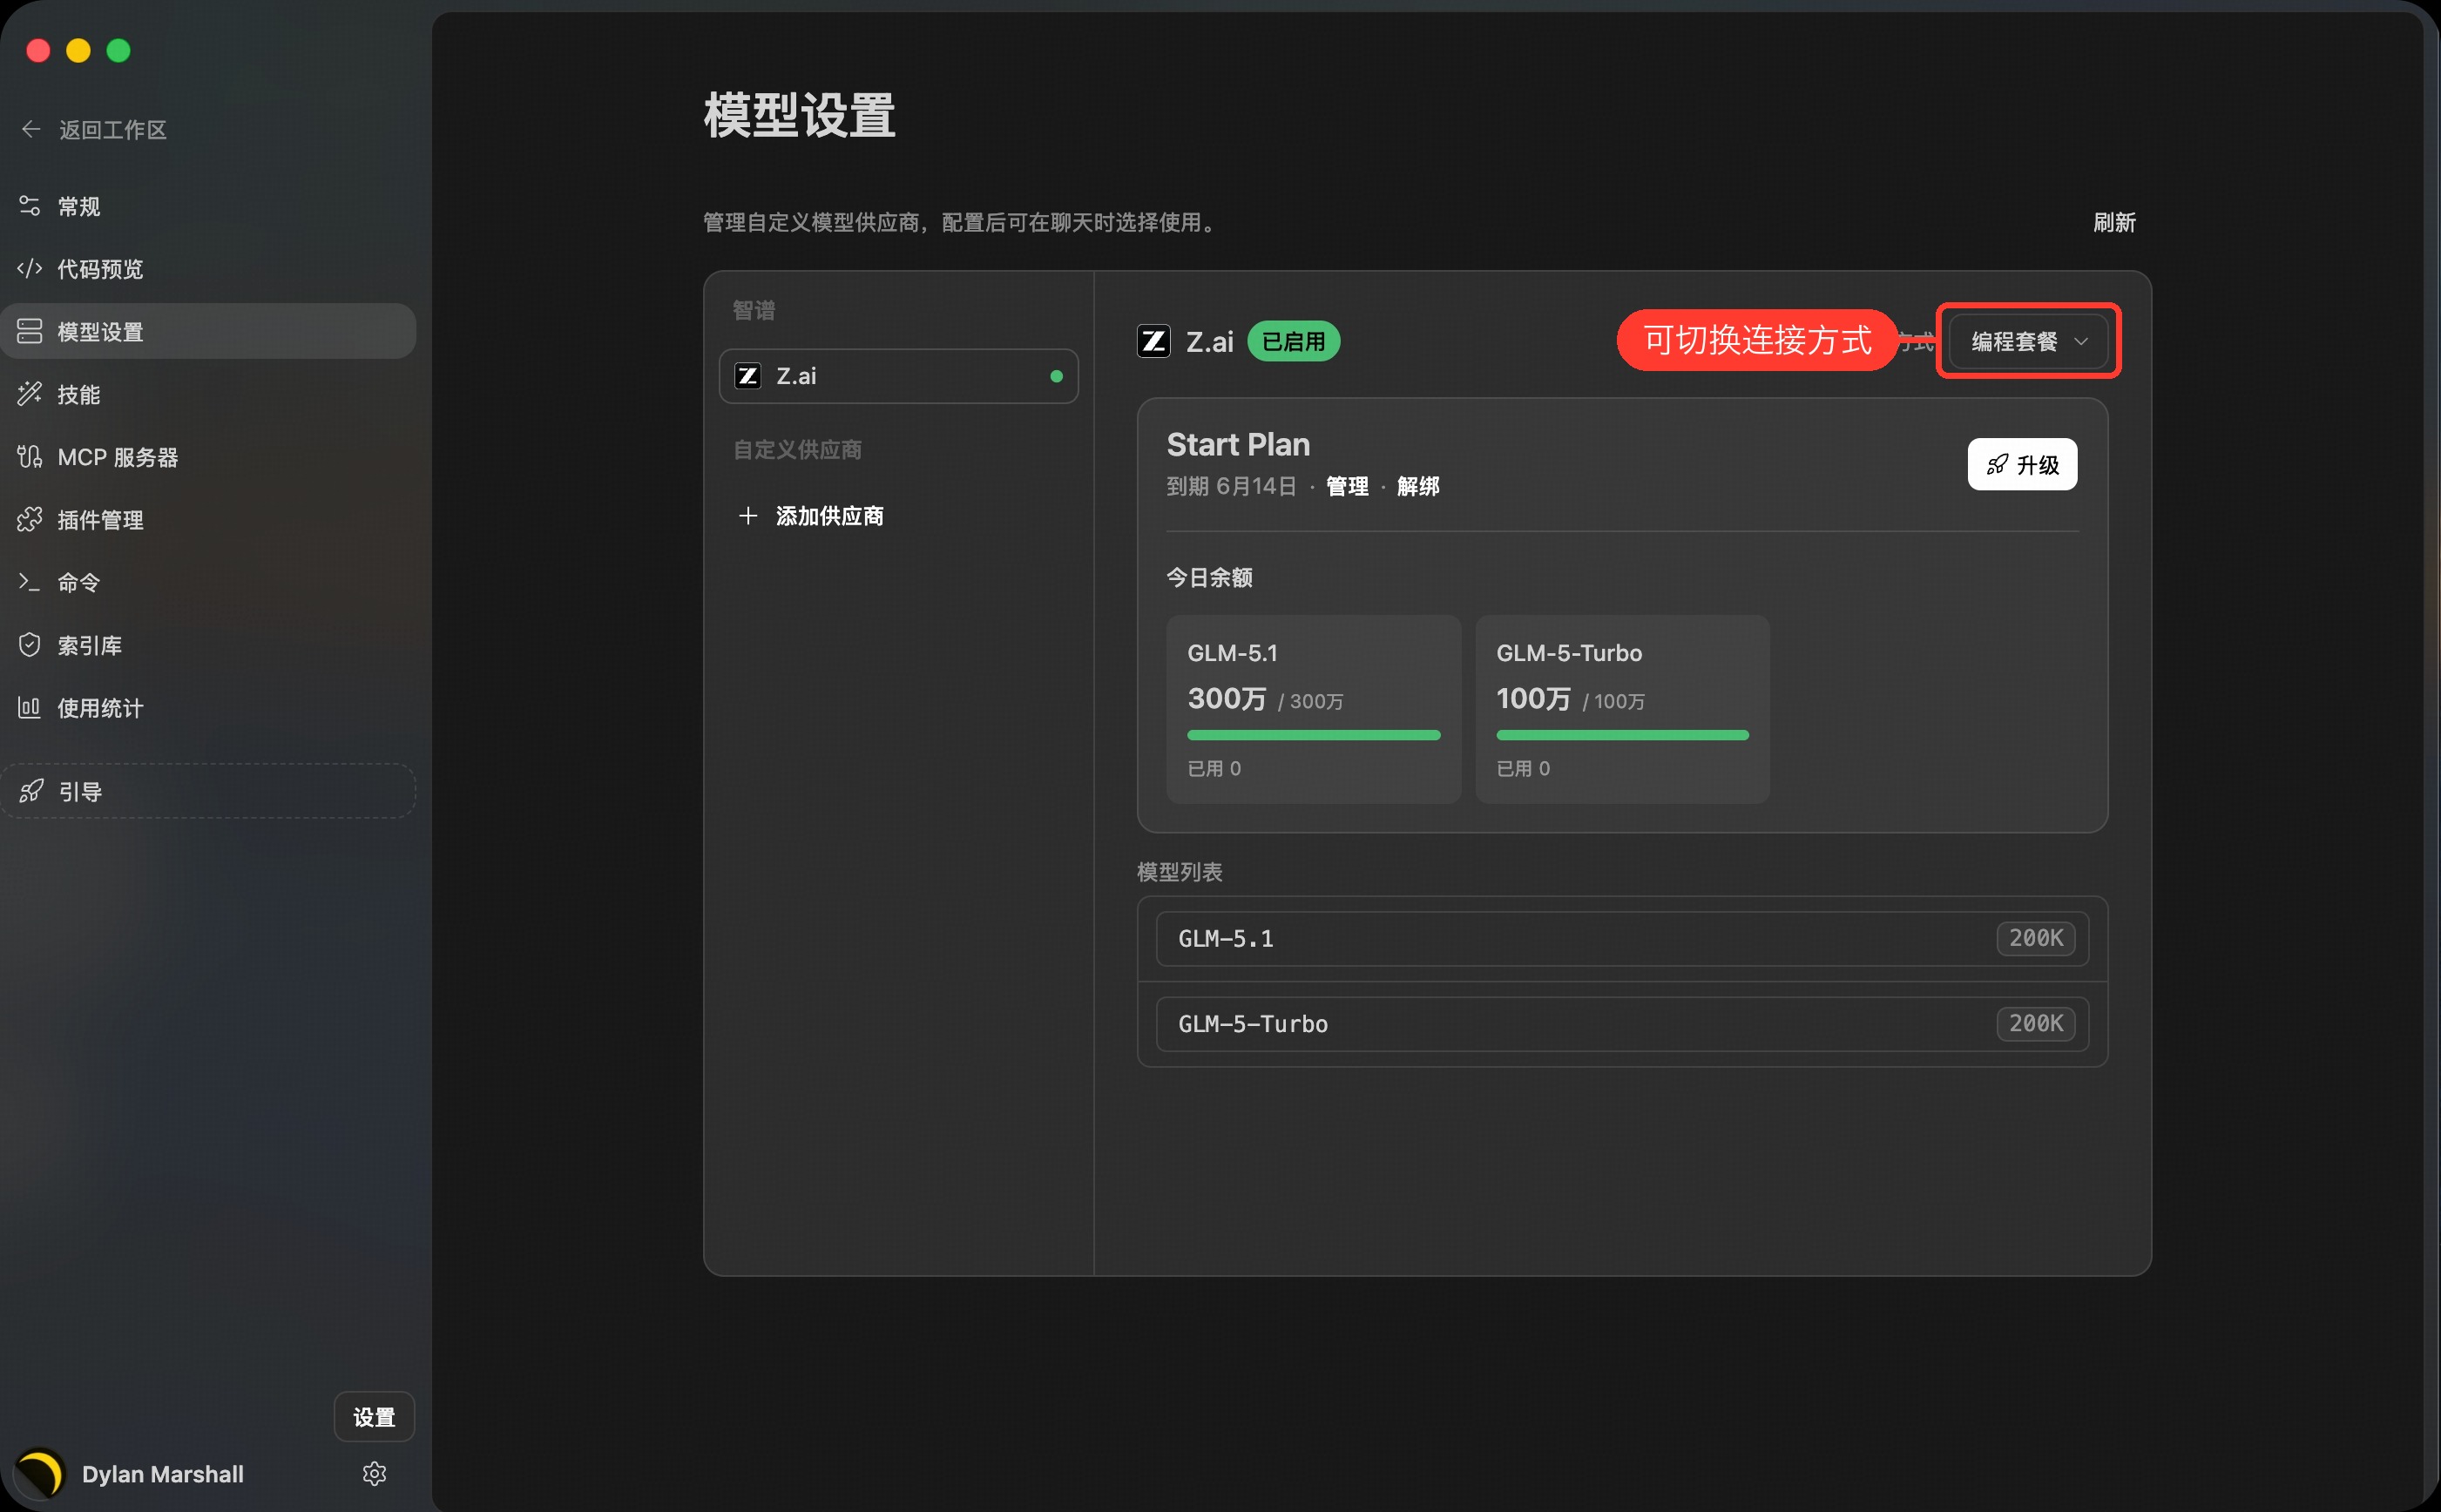
- 完成账号连接并开启启用开关,即可使用 GLM-5.2、GLM-5-Turbo 等内置模型
- 右上角同样可以在「编程套餐」与「API Key」两种连接方式之间切换
连接后,供应商页面会展示当前套餐与今日各模型的余额、已用量:
体验额度与订购套餐
与 BigModel 相同,新用户可享受每日免费的 GLM 旗舰模型体验额度;也可以直接在页面内浏览并订购 GLM Coding 编程套餐(Lite / Pro / Max,美元计价),支持包月、包季、包年。
使用 API Key 接入
根据你的账号类型选择连接方式:
方式 A:GLM Coding Plan(编程套餐 API Key)
- 在 Z.ai 供应商页面右上角,将连接方式切换为「API Key」
- OpenAI 接口地址填写 Coding 专用端点:
https://api.z.ai/api/coding/paas/v4 - 填入从 Z.ai 平台获取的 API Key
- 可用模型以账号权限和供应商返回的模型列表为准
注意:Coding 端点不能替换为通用端点
https://api.z.ai/api/paas/v4。
方式 B:模型资源包 / 充值余额
- 在 Z.ai 供应商页面右上角,将连接方式切换为「API Key」
- 任选一种协议:
- Anthropic 协议(默认):Anthropic 接口地址保持
https://api.z.ai/api/anthropic - OpenAI 协议:OpenAI 接口地址填写
https://api.z.ai/api/paas/v4
- Anthropic 协议(默认):Anthropic 接口地址保持
- 填入从 Z.ai 平台获取的 API Key
- 可用模型以账号权限和供应商返回的模型列表为准;也可以点击「添加模型」补充其他可用模型
Anthropic(Claude API)
- 通过上述任一方式进入 模型设置 面板
- 在左侧供应商列表底部点击「添加供应商」
- 名称填写「Anthropic」
- Anthropic 接口地址填写
https://api.anthropic.com - 在「API Key」输入框中填入从 Anthropic 平台 获取的 API Key(可在平台内查看用量与套餐)
- 保存后,ZCode 会按供应商返回的可用模型列表展示模型
- 如未自动加载,可通过「添加模型」手动补充 Anthropic 支持的模型

OpenRouter 平台
1. 创建 API Key
前往 OpenRouter 平台,注册账号并创建 API Key。
2. 在 ZCode 中配置
- 进入 模型设置 面板
- 在左侧供应商列表底部点击「添加供应商」
- 名称填写「OpenRouter」
- API 基础 URL 填写
https://openrouter.ai/api - 填入 API Key
- 开启启用开关即可使用

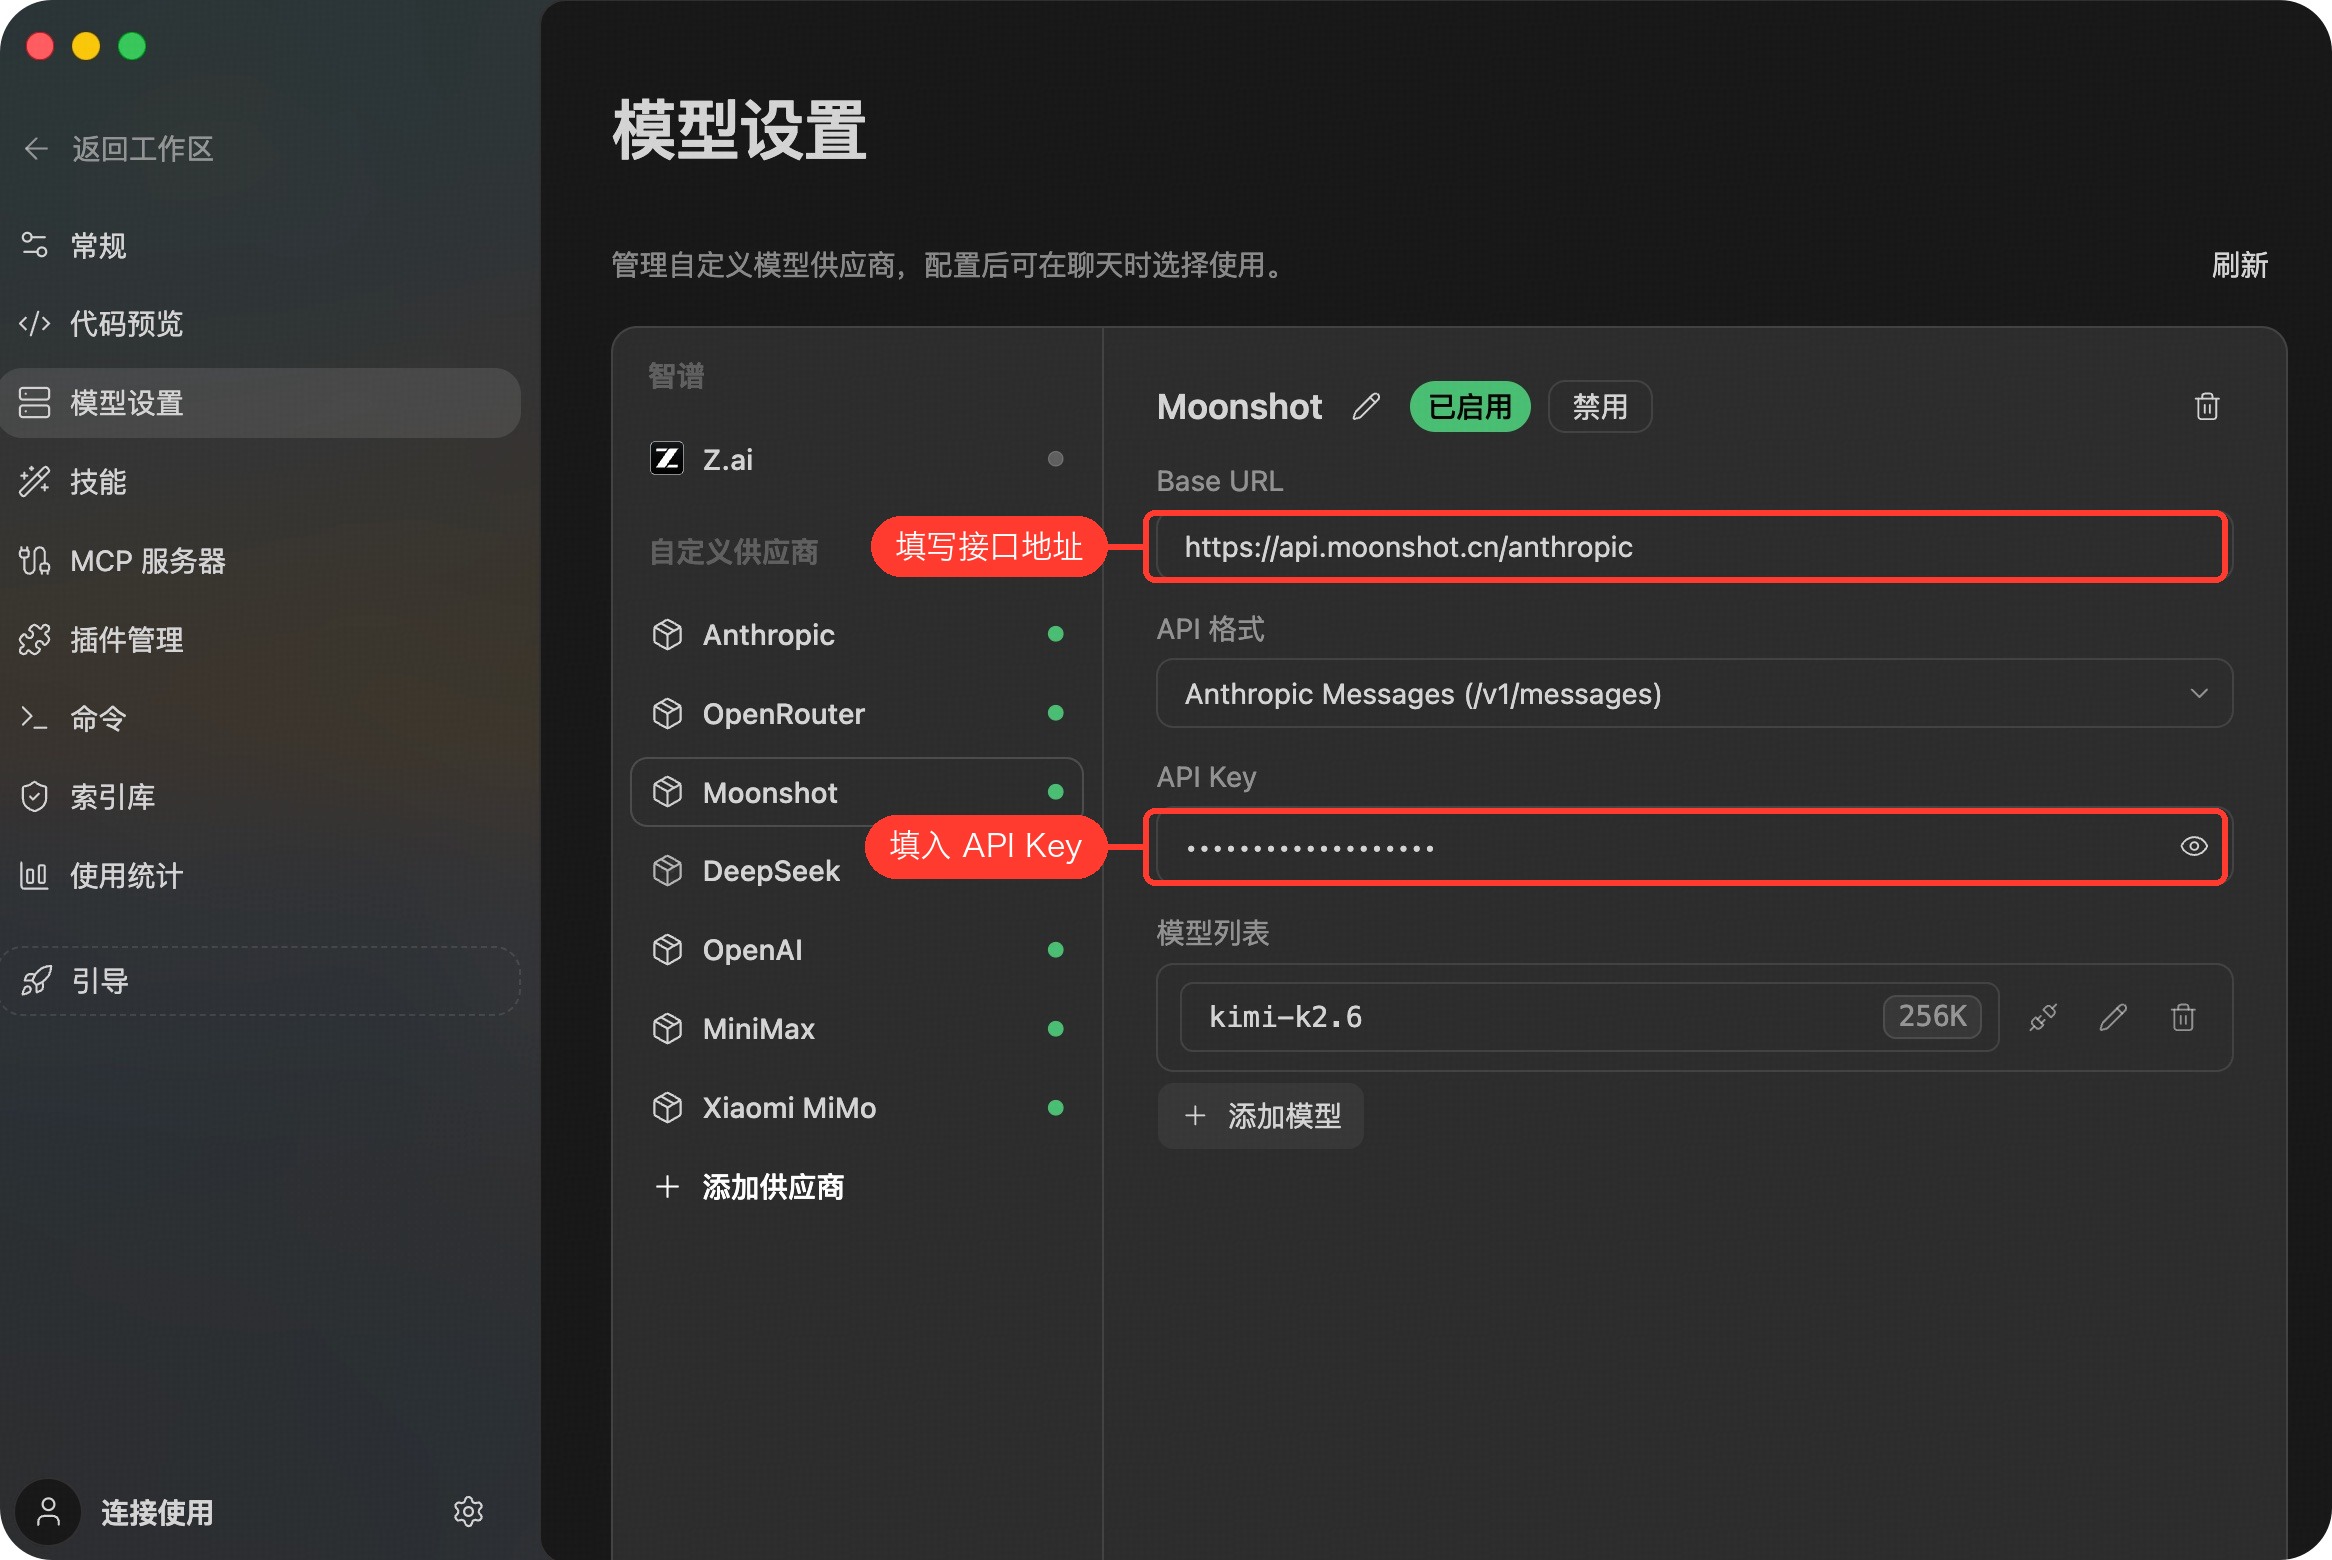
Moonshot
- 进入 模型设置 面板
- 在左侧供应商列表底部点击「添加供应商」
- 名称填写「Moonshot」
- Anthropic 接口地址填写
https://api.moonshot.cn/anthropic - 前往 KIMI 开放平台 获取 API Key(可在平台内查看资源包与用量),并填入「API Key」输入框
- 保存后,ZCode 会按供应商返回的可用模型列表展示模型;如未自动加载,可通过「添加模型」手动补充 Moonshot 支持的模型
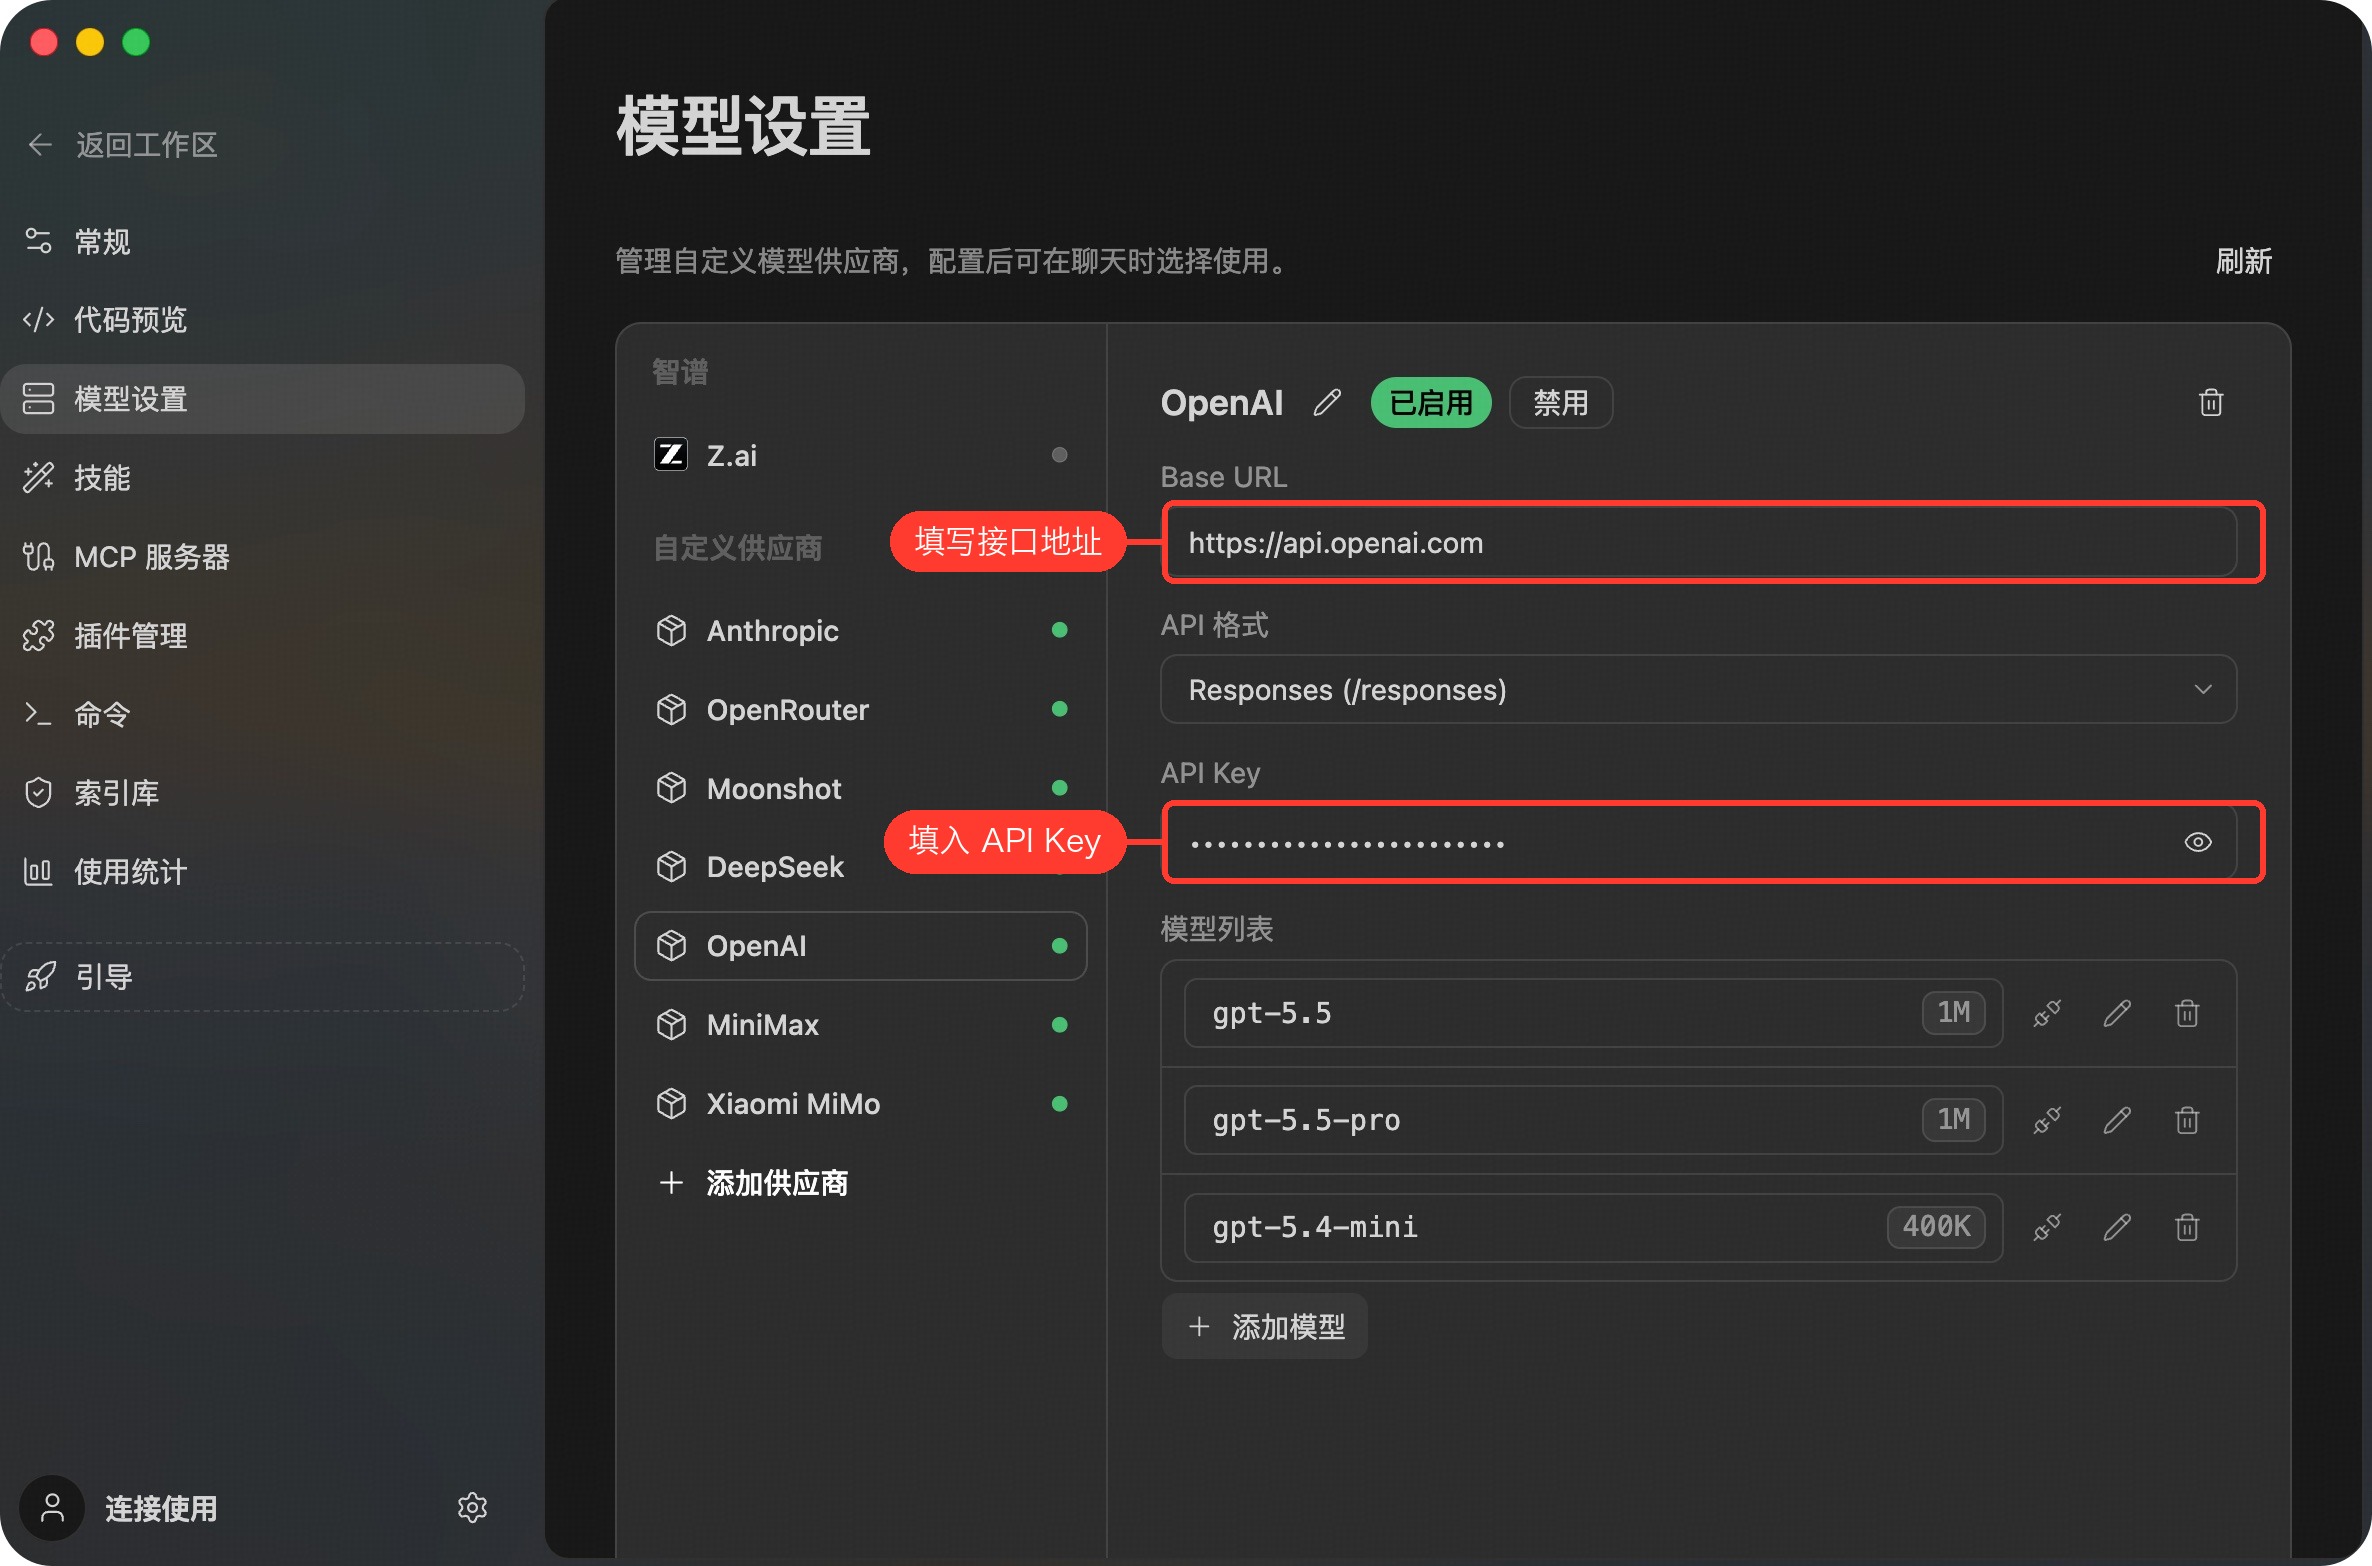
OpenAI
- 进入 模型设置 面板
- 在左侧供应商列表底部点击「添加供应商」
- 名称填写「OpenAI」
- API 基础 URL 填写
https://api.openai.com - 在「API Key」输入框中填入从 OpenAI 平台 获取的 API Key
- 保存后,ZCode 会按供应商返回的可用模型列表展示模型;如未自动加载,可通过「添加模型」手动补充 OpenAI 支持的模型
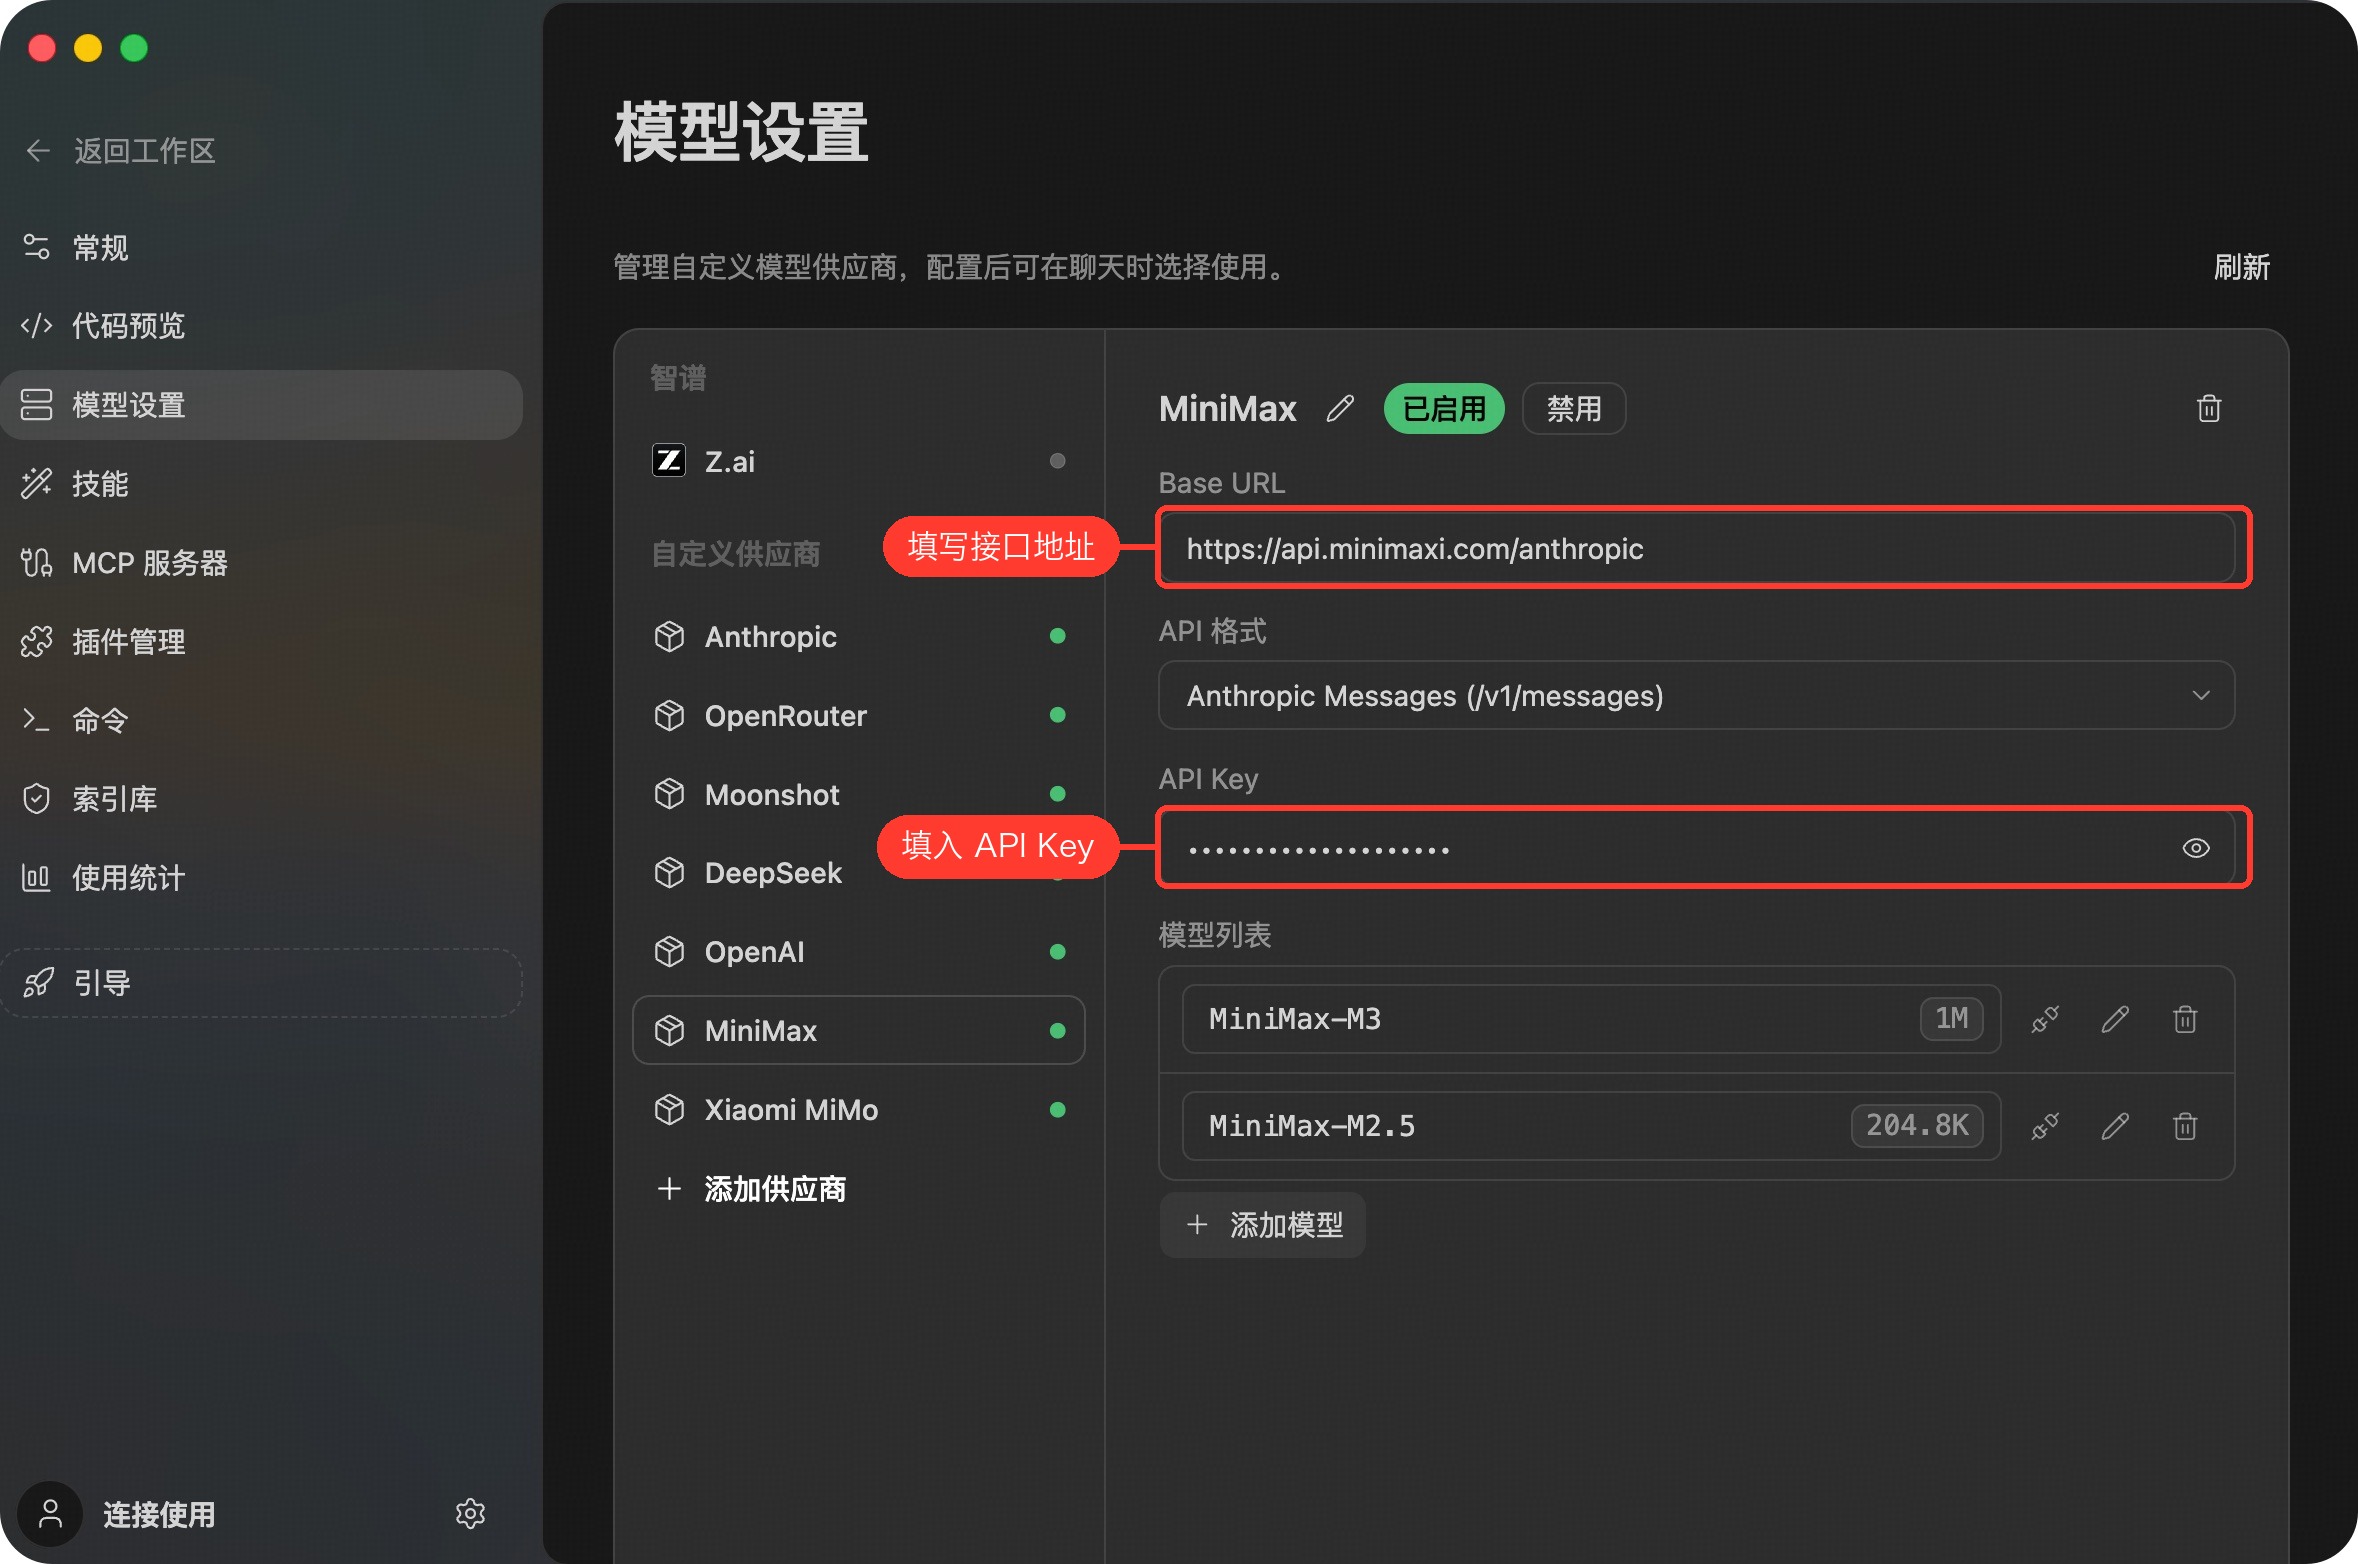
MiniMax
- 进入 模型设置 面板
- 在左侧供应商列表底部点击「添加供应商」
- 名称填写「MiniMax」
- Anthropic 接口地址填写
https://api.minimaxi.com/anthropic - 前往 MiniMax 开放平台 获取 API Key(可在平台内查看套餐与计费),并填入「API Key」输入框
- 保存后,ZCode 会按供应商返回的可用模型列表展示模型;如未自动加载,可通过「添加模型」手动补充 MiniMax 支持的模型
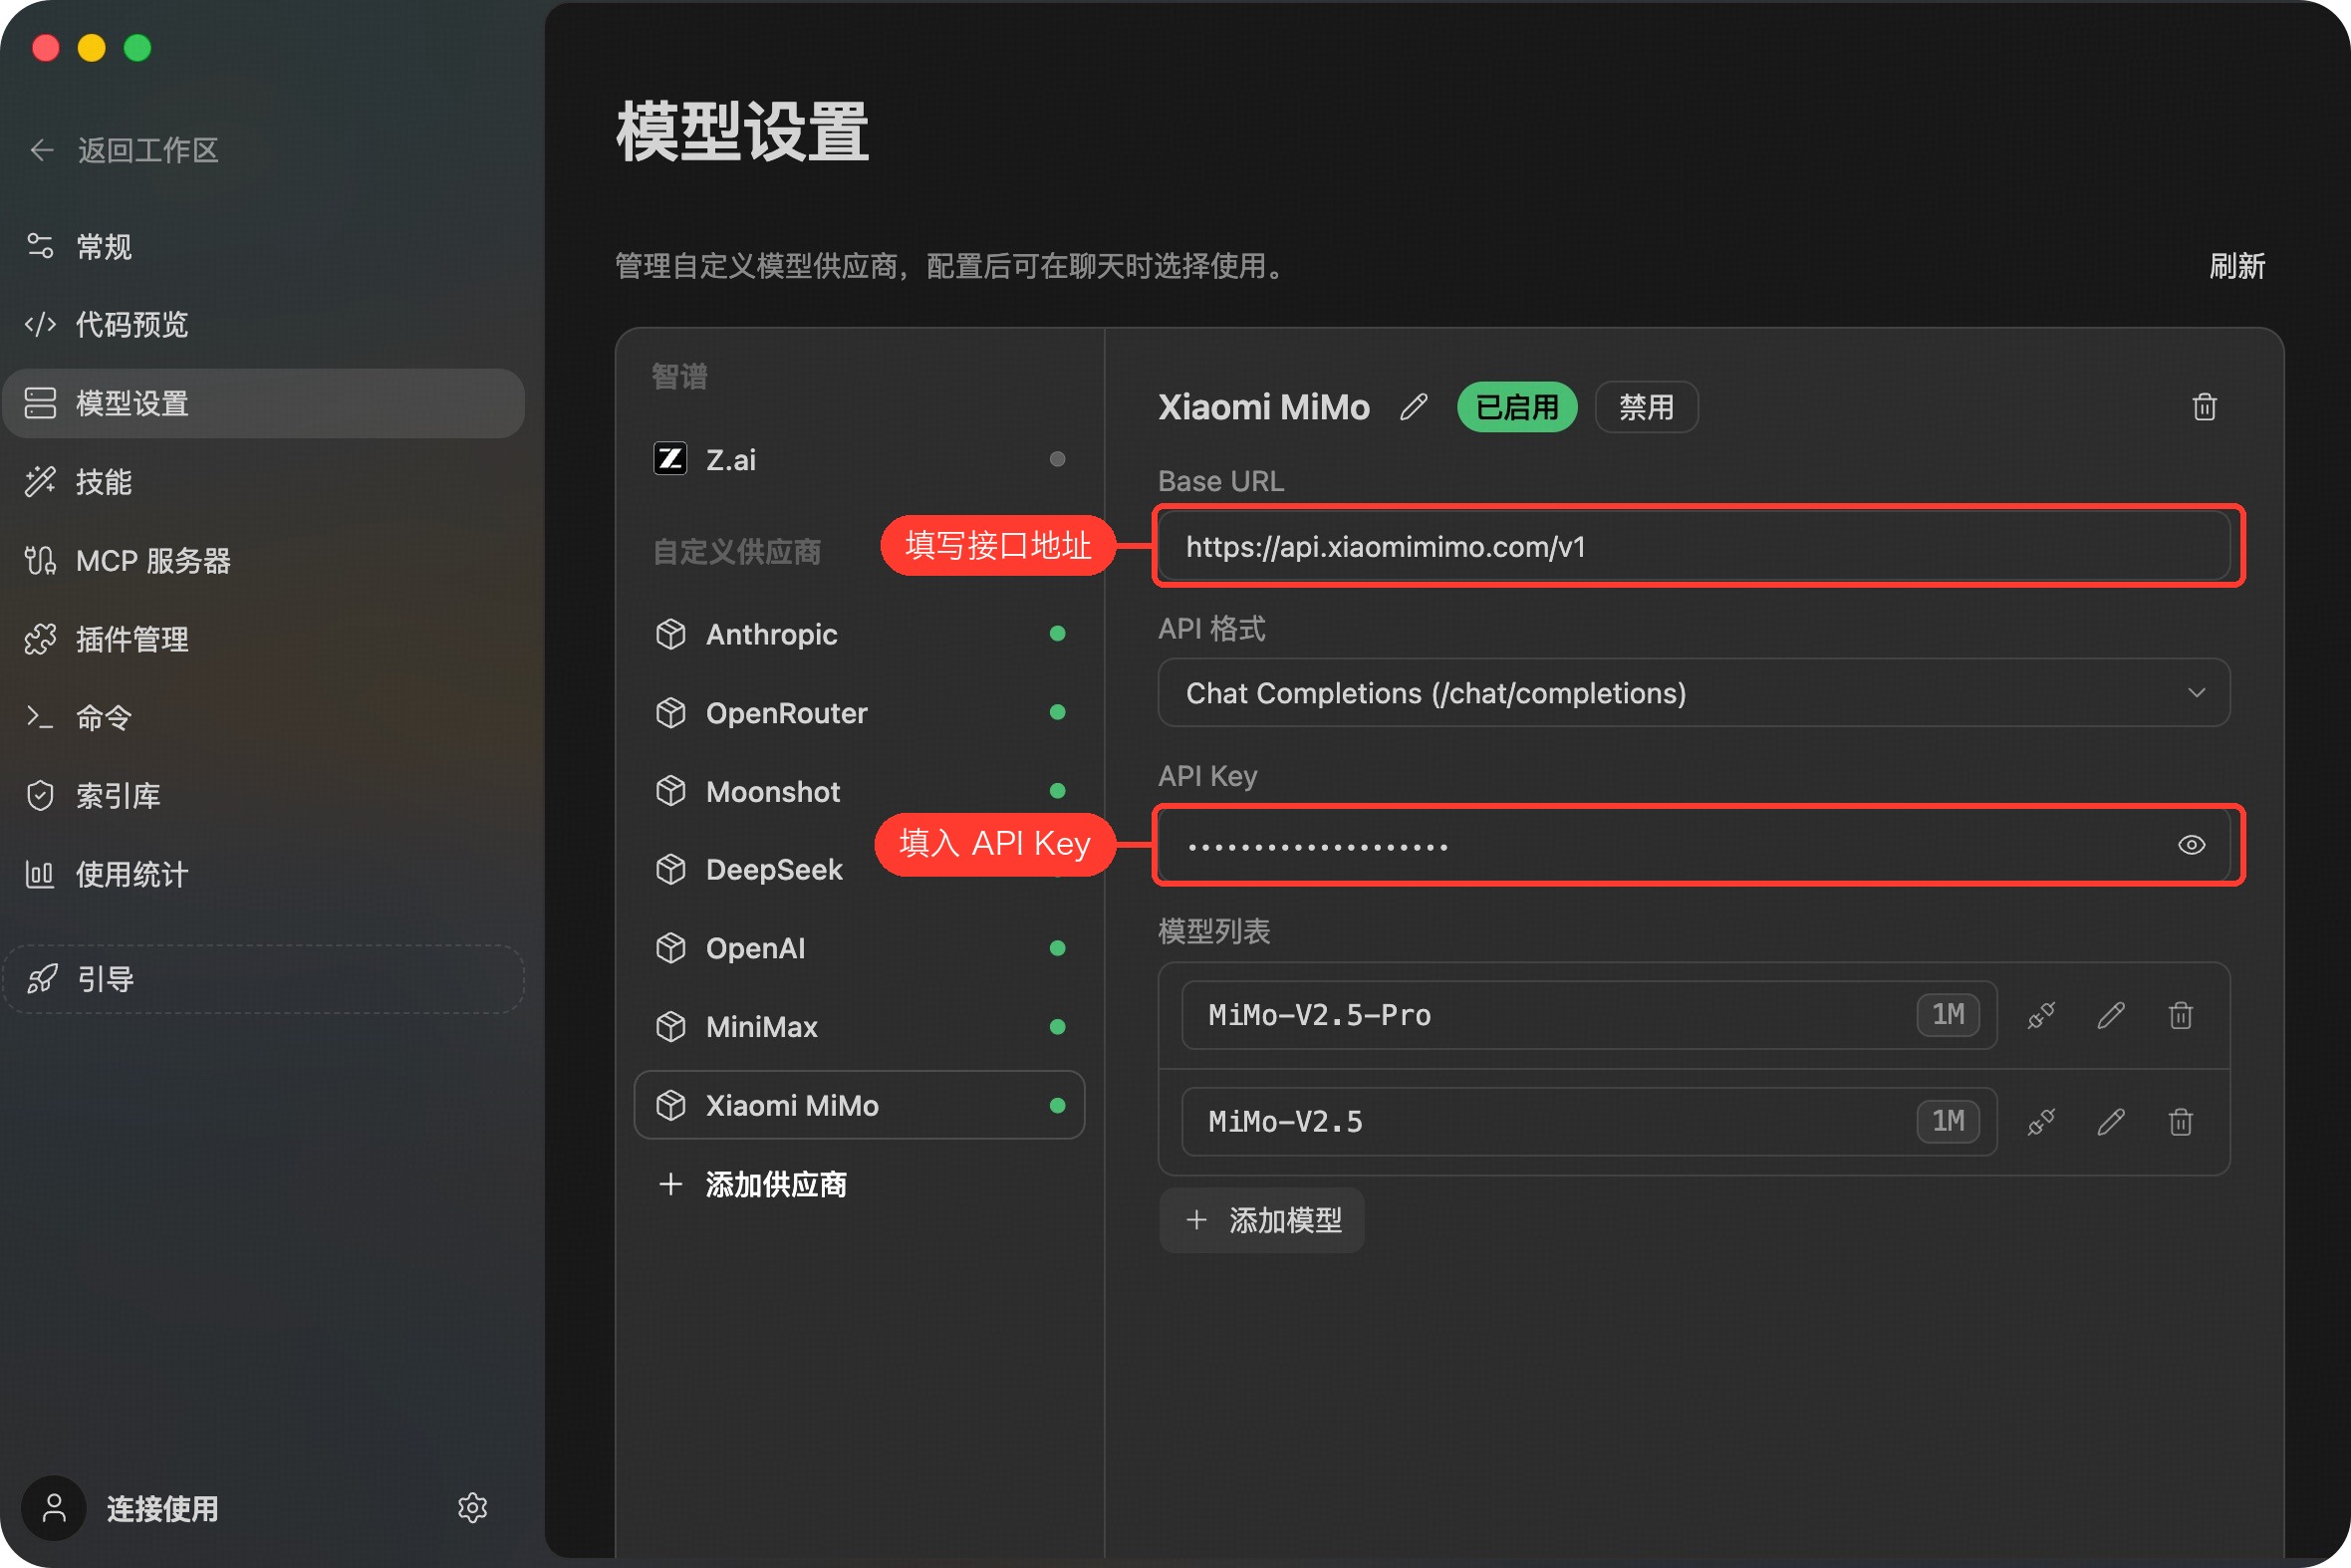
小米 MiMo
- 进入 模型设置 面板
- 在左侧供应商列表底部点击「添加供应商」
- 名称填写「Xiaomi MiMo」
- API 基础 URL 填写
https://api.xiaomimimo.com/v1 - 前往 小米 MiMo 开放平台 获取 API Key(平台提供 Token Plan 套餐,可按需开通),并填入「API Key」输入框
- 保存后,ZCode 会按供应商返回的可用模型列表展示模型;如未自动加载,可通过「添加模型」手动补充 Xiaomi MiMo 支持的模型
自定义供应商(兼容 Anthropic / OpenAI 协议)
ZCode 支持添加任何兼容 Anthropic / OpenAI 协议 的模型服务作为自定义供应商——既可以是公网模型服务,也可以是团队统一维护的企业模型通道或内网自托管服务。
当你选择对应厂商的 Base URL,或填入兼容的接口地址后,系统会自动识别并加载可用模型列表,无需手动逐个补充模型名称。
配置步骤
- 进入 模型设置 面板
- 在左侧供应商列表底部点击「添加供应商」
- 自定义填写名称:为供应商命名(如 claude、deepseek 等)
- 选择对应厂商 Base URL:从下拉列表中选择或手动输入 API 基础 URL
- 填写 API Key:输入对应服务的 API 密钥
- 自动加载模型列表:接口地址确认后,系统会自动拉取并填充可用模型列表
- 开启启用开关后即可开始使用
以 DeepSeek 兼容接口为例:
- 名称填写「DeepSeek」
- Anthropic 接口地址填写
https://api.deepseek.com/anthropic - OpenAI 接口地址填写
https://api.deepseek.com/v1 - 填入从 DeepSeek 开放平台 获取的 API Key
- 可用模型以供应商实际返回的模型列表为准;必要时手动添加团队约定的模型 ID
- 点击保存即可

团队使用建议:企业模型通道建议由团队统一管理 Base URL、API Key、模型列表与访问权限,保证长任务执行过程中的连接稳定性和可追踪性。
验证配置
配置完成后,在对话框的模型选择器中选择对应通道,发送一句简单指令测试。确认模型可用、响应稳定即可开始使用。